If you recall earlier videos, some have been known to plant evidence, to attempt to silence Journalists, Lawyers, and Activists.
Allowing (est) 5,000 employees access to emails, phone numbers, and other contact information, opens up potential towards phishing attacks mentioned in the video below (hypothetically):https://www.youtube.com/embed/wo7maZzLeb8
A reminder of what can happen to those thinking “privacy doesn’t matter.”
Today it may be a lawyer defending Human Rights, tomorrow it could be anyone.. depending which direction political winds blow.
DISCLAIMER: Below I created a tutorial on ‘flashall’ method to get up and running with this firmware. I include 2 outside videos at the bottom for those who prefer GUI applications for upgrading firmware.
Modem recovery firmware available here, in case you mess up.
FLASHING MODEM FIRMWARE
Before following below, make sure to first install adb / android-tools. Required for ‘flashall’ script.
(see below screenshot to see above commands in action. Make sure to download the package.tar.gz into the ‘helpers’ directory, to allow ‘flashall’ to make use of it.)
After this, you will notice the modem going ‘down’. Then it will reappear / come back alive (reboots).
If you get an error, it can’t hurt to try ‘flashall’ again.
Just be sure you have android-tools / fastboot, and extract Biktor’s firmware into the same directory as tools/helpers (the location of the flashall script).
When all is successful, you should see a message from a dedicated number telling you about the success of your new modem firmware.
Notice problems with modem disappearing? Take a look at recommended settings here.
UPDATE: OUTSIDE VIDEO GUI RESOURCES BELOW
In this article I opted to share a quick commandline route.
For those who prefer a GUI tool (to upgrade the firmware), below I embedded 2 videos on this.
Scroll down to take this route.
RELATED: FIRMWARE UPDATER ON POSTMARKETOS
(Below offers 2 separate videos on the same tool – watch whichever you prefer.)
🔗THANKS FOR SHARING (one way to support is sharing links on Social Media, Telegram…)
(below, I share screenshots I put created, underlining key points)
WHISTLEBLOWER REPORT HIGHLIGHTS IMPORTANCE OF ANONYMITY ON SOCIAL MEDIA:
EARLIER 2022 STORIES OF CONCERN
Firehose Data Allows Real-Time Tracking (2022)
Mitto AG Abused SMS 2FA For Mobile Surveillance (2022)
TIP: Use a dedicated email for social media accounts. Don’t use the same email or phone number you have connected to a bank, or “big tech” platform accounts. Every account sharing information can be neatly linked together.
🛡️ Twitter Introduces A New Phone Number Badge
This ‘badge’ will allow users to demonstrate they have a phone number connected to their account.
I see no problem with this, as long as phone numbers stay voluntary. Although it could potentially open certain users up (with this badge) to more likely attacks (earlier bug: phone number reveal).
Given information covered in the above video, requiring a phone number / identification would create a serious safety risk to activists, journalists, lawyers, and others in a sensitive position.
Not only does a phone number tie directly to a user’s identity (more reliably so than other means), it also opens them up to a host of new targeted “spear phishing” attacks.
The whistleblower report states up to 5,000 Twitter employees have access to sensitive user data. And, a Twitter employee was arrested for using their access to spy for the Saudi gov.
A country that executes its own dissidents.
There is no “safe” way for activists to share their phone number (or other personally identifiable information).
Email would make for far more secure form of 2FA, with an added bonus of protecting user identity, personal safety.
Regardless of the whistleblower report, I do hope Twitter remains a success. As long as it remains a place allowing free flows of information.
The only way this remains possible is if anonymous accounts are allowed to stay. As long as they are, I will continue to support Twitter over other mainstream Social Media platforms (this way your data remains in your hands, depending on practices).
🧅 🔒 Twitter Now Has A Tor Hidden Service Onion Address
This one is a great move by Twitter. Nothing but good things to say about it.
We live in a world where power has become increasingly centralized…
🌎 A world where data contractors / monopolies can abuse access, power.
Simply Put: We simply can’t trust our personal data in the hands of strangers. No matter who they may work for.
When one has enough data, especially biometric data, one can use this in combination with AI, media, and various sensory applications / targeted experiences, to engineer future human behavior.
This is the very real future we are looking at. Don’t underestimate the power of data.
It’s why this page exists. Privacy (moreso anonymity) is vital to a free society, where people hold the power.
TIP: By proxying most of your internet data into mixnets, I2P / Tor (and newer options like Lokinet), you can make that data useless (instead of identifying).
Think of Tor as a haystack. Instead of the normal circuit your network packets route, Tor uses multiple layers of mixing / encryption to mix Tor browser client data into
In this world of increase, truly “free speech” cannot exist without the ability for anonymity.
💎 THANKS FOR SUPPORTING / SHARING THIS
Do You Think Twitter Really Fired Mudge For The Reasons They Stated?
For those following shortcut playlists such as Nextcloud as a Tor hidden service (see selfhost playlist example), or who support the Supporter image.
Really, I hope this post helps anyone interested in selfhosting. Whether or not you support my work I make these posts for everyone and welcome followers, shares, monthly members and ☕ coffee (if you like). End of post includes “present” idea for regular supporter incentives.
I really appreciate all my followers (thank you! 🙂) and try to make public all I can, as able. My goal here is to help.
Selfhosting
Steve Wozniak is right. He has had quite a bit to say about Cloud computing, and the mistake it is for those who care about their privacy.
It’s important to differentiate: when we say “the cloud is not your computer”, we are NOT talking about a physical server you own and can touch! We are talking about remotely hosted cloud space you RENT.
THAT is not your computer. And you have no control over who or what is accessing it beind the scenes. It’s better we act like it.
iCloud is an example of NOT your computer. Any rented virtual server / cloud space is NOT your computer.
“Never trust a computer you can’t throw out a window”. -Steve Wozniak
I love that quote. It’s really that simple.
If you, yourself setup the physical hardware (or purchased from someone you trust), THAT can become the (only) “cloud” server you trust.
Nothing less is ensured private. If you can’t control the hardware, you don’t control the outcome.
Options include something like Nextcloud on a Raspberry Pi or Pine64 / other singleboard computer. THAT can be a server you can trust (trust as long as you know what you are doing). A server you own.
Listen, rented cloud storage is NOT your computer! I’ve been stating this since the first days of this channel.
(Thought it can’t hurt to say it again)
When you rent cloud / virtual hosting, you can’t think that is truly private, right? Because it is not. There is nothing private about rented cloud storage.
The cloud is not your computer. It is rented space on a computer, but it is not your computer.
Other people can access it. Employees of the company. Potential attackers. Snoops. Misfits.
Who really knows who else?
If you are going to rent cloud space, at least encrypt that data ON YOUR PC, BEFORE sending it to said cloud. Use something strong. If you want to ensure no access to the data within.
One interesting test is attempting to upload something that has been encrypted independently (such as with zulucrypt). Certain cloud providers have been reported to outright REJECT encrypted files.
If you are going to use rented cloud storage, at least encrypt your files before uploading. Try it.
Let me know in the comments if your encrypted file is rejected. I would love to hear the story! 😁
Sponsors (No Conflicts Of Interest)
I don’t have sponsors. It’s why I don’t recommend many companies (like, ever). If you want to help with content here, I accept coffee, XMR, cashapp. All options listed on frontpage.
Not saying it’s a bad thing to have sponsors. Not at all. I enjoy channels who have sponsors! And I’m really not here to make anyone look bad.
But it’s always smart to do your own research if a channel or writer benefits from recommending a product. It’s common sense.
Take for example someone may recommend cloud / virtual hosting specifically for privacy. It’s always a good idea to find out if they are benefiting from this recommendation.
And if they are benefiting, research further to find out if there is a better option (my only aim is to provide answers, and otherwise hope to stimulate free thought).
I wish all creators the very best, and only change my own recommendations based on what I know to be true.
I’m not saying there is anything wrong with virtual hosting / cloud rentals. Not at all!
In some cases it might be the right decision for you.
But for peak privacy capability (if this matters to your threat model), alas, it is not.
You could benefit from this if you simply wanted to host a small business presence on the web, without concerns for privacy on that server.
I’m telling you all this because I’m happy to tell you the good, the bad and ugly.
Some people want to set everything up from scratch. I totally get that (it’s the best way).
One example is the common recommendation “create your own VPN” for privacy.
This isn’t a great idea.
Obviously Tor / i2p / lokinet (and other multilayer randomized meshnets) will be superior to any VPN alone.
Creating your own VPN on shared cloudspace may leave you as one of the only users to be seen.
That’s less “needle in haystack” layering blend in with a single hop of separation.
This doesn’t mean you can’t combine VPN with Tor to enhance some cases. But ensure you are doing this correctly. A VPN is tied many times to a user’s identity. And it’s best to avoid this when a user’s goal is anonymity.
I’d rather recommend proxychains as an additional option for journalists, lawyers, and others who need anonymity without over complexity.
But, for the vast majority of people, Tor Browser alone (with a bridge) is simple and secure enough.
I’m still feeling a bit rough, but glad I cranked this one out. Hopefully will get more done soon. Hope you get something out of this article, and see you in the next one! 🙂
THANKS TO: REGULAR SUPPORTERS (If you fit this reach out so I can share current img)
For those interested in a more ready to use all in one Supporter Image I am working on: offers fully automated selfhosting setup (automated new Nextcloud Tor hidden service onion + private key generation (only you have the private key / onion as it doesn’t exist until you first login) + Privatebin “zero knowledge” pastebin + onion Tor wifi router + additional menu shell and customization options + more unique ideas implemented soon).
The Supporter selfhosted pi image is something unique I’m happy to continue to improve and maintain. Carrying custom options not mentioned. Goal is to offer something unique. A matter of selfhost convenience focused at privacy options, setup automated (initial setup asks only for wifi network preferences, network cards etc and takes care of the rest, displaying your newly generated onion address).
Currently offered as a way to say “Thank You” to those who ever bought (over any period of time) total of 6 ☕ ☕ ☕ ☕ ☕ ☕ coffees (or equivalent Monero/XMR, cashapp donations), + offered to those who joined membership for 6+ months. It’s also available as an “extra” service here for those who just want to donate to download (accepting monero and cashapp donations here).
If this is you, please let me know. I’m excited to share this with you! 🙂
It’s something I came up with to incentivise supporting the unsponsored, demonetized tutorials / videos (over 182) and other works. I want to be able to continue expanding on ideas, public offerings, and improve content quality, + have the opportunity to share more servers with everyone. I can only meet all goals with some support of community. To those who have, thank you. ❤️
Share this post with everyone. Leave your thoughts below.
(Share to help this grow. ❤️ ———————————————————————- PUBLIC COMMUNITY SERVERS: 🧅🔐 ANONYMOUS GITEA (.onion):Books, Code/Scripts, Wiki, more (make a repository) 🧅🔐 PASTEBIN (.onion): anon pastebin pw protect, zk-256bit, “Burn After Reading” + more ———————————————————————- 💖 🤗 SUPPORT (If you like) 🎁 EXTRAS: something unique for your Support here ———————————————————————- FOLLOW: ✍🗒 MASTODON 🐦 TWITTER 📺 🎞 PEERTUBE 📺 🎞 BITCHUTE 📺 🎞 ODYSEE 📺 🎞 YOUTUBE ——————————————————————— ✉ CONTACT ————————————————————————
Logging a real-world failing drive experience, carrying important data (not in earlier backup). Followers asked for content including behind the scenes, ‘daily activities’. Here we are. Thank you for the suggestions.
(Unfortunately, rendering gigabytes of video + imgs (regularly) became tough on our Harddrive. )
Tools You Should Know About
smartmontools (command: smartctl)
ddrescue (GNU ddrescue) (copy important files before attempting to avoid ‘finishing off drive’!)
photorec (copy important files before attempting to avoid ‘finishing off drive’!)
💾 ⚰️ FAILING HARDDRIVE: WHAT TO DO
This video offers advice, putting you in a more optimal position to recover your most important data, BEFORE a given disk ultimately fails (completely dead).
Recommending pre-failure testing tools like smartmontools (detect a possible failing drive), before it completely dies.
(let me know in comments if monitoring disk health is something you would like to see more of)
Of course it goes without saying, backing up your important, personal files and keys (ahead of any issues), is highly recommended (and probably the most important step).
TIP: Create an encrypted volume, prior to adding backup files. Next move that newly created encrypted volume to your outside media (for storage).
Create Hidden Encrypted Backup Inside Video File (Steganography + Crypto)
(the following video displays a Linux Pinephone – but, you can use Zulu-crypt on ANY Linux machine, in the exact same way!)
You don’t have to create a “hidden” volume if you prefer not to. It is just as easy to create a normal LUKS volume, on the same Zulu-crypt menu.https://www.youtube.com/embed/87yg8peq3kw
Watch Today’s Video
BEFORE ATTEMPTING TO COPY DRIVE
Attempt to mount partition carrying your /home directory (carrying your most personal, important and sensitive files).
If you can successfully mount this partition in question, copy your MOST IMPORTANT files first. (ie: .ssh directory (keys), /home/user/cryptowallets, /home/user/Pictures, /home/user/Documents)
Do this priority copying FIRST.
At some point the drive will fail, COMPLETELY. And by then it will be too late (unless you have identical drives laying around with which you can swap working parts to attempt to reanimate the drive… save yourself the trouble.).
When faced with a failing harddrive, FIRST priority should always be recovering our most important / personal / sensitive files, BEFORE complete failure of the drive.
RESTORATION
AFTER SAVING YOUR MOST IMPORTANT FILES TO ANOTHER DISK…
You can restore them to a new installation by copying them (and their directories) into the identical location of your user $HOME directory (ie: /home/user).
Moving the copied files (from failing drive) into a new installation home directory (or existing), restores the original ssh keys (in case you use key authentication), accounts for messengers, and browser / program customization and bookmarks.
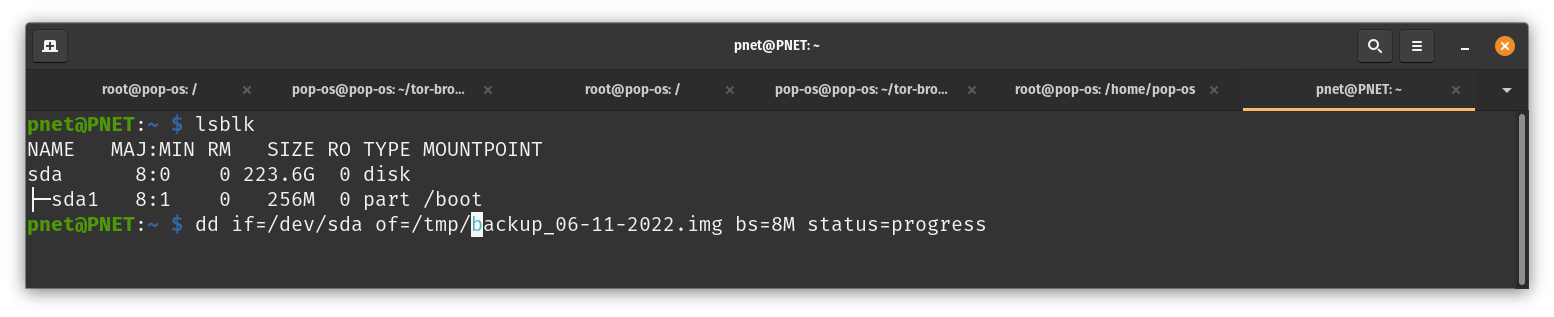
Backup Using dd Video
Here I covered backing up your disk with dd command:
List Your Detected Partitions:
lsblk
Example dd Backup Command
The dd command uses various options (leave a comment if you need help!)
The above example command would backup the entire /dev/sda harddrive (if= is the ‘input file’ or drive). Making if=/dev/sda backup the entire /dev/sda drive. As another example: if=/dev/sda1 would backup only the /dev/sda1 partition.
The of=/mnt/disk/backup_06-11-2022.img part is where you would like to send your backup image. You can create any name you would like for your backup, ending the filename in .img to represent an ‘image’ of your partition, or entire drive (depending what you choose for if=)
Example Screenshot (Backing Up)
The above command sends our image backup of /dev/sda to /tmp/backup_06-11-2022.img.
From here it’s important to move it to your newly created zulucrypt volume (/tmp directory is just that, temporary: we are taking advantage of the temporary nature – but remember, never send a backup to a potentially failing drive (defeats the entire purpose of backup).
Regular multi-gigabyte rendering (ie: current count is 181 videos rendered on channel) is hard on our hardware. If interested in helping the channel: various Support options exist on frontpage.
(either way, planning to continue guides)
Sharing the link, post, or video, is another a great way to Support this!
💽 Are you interested in learning more about harddrive failure monitoring, or recovery software? Let me know in the comments. If I feel there is enough interest, I will make a tutorial.
Thanks for watching! Any questions on this video? Ask below!
Just got back from close to a week out of town, and excited to be back!
Last 2 days have been working on this video to share with you all.
Doing my best to cover (what I believe) are monumental precedents. This video is one example.
We have to be careful about throwing support behind precedents being set, as we know private profiteers will continue pushing the envelope over what has been done, and what could be done…
Dangerous to independent autonomy, privacy, Human Rights…
And personally, I don’t think weaponized taser drones would be all that effective as a security feature for the case they mention.
The only positive, (I guess) would be as a distraction for a potential attacker.
Supporter Community Early Look (May 13th): Now Public (For Everyone)
(if interested in seeing posts ahead of time, check out the Supporter Site – Free to follow)
The beginning of this writing breezes through subjects found in the video (below), while providing copy and paste convenience.
Later on I begin to include a few sysctl additions that may help mitigate certain attacks.
If what’s on the page isn’t clear, leave a comment, send a message, or check back later and see if anything is new.
Learn The Basics
Get Started
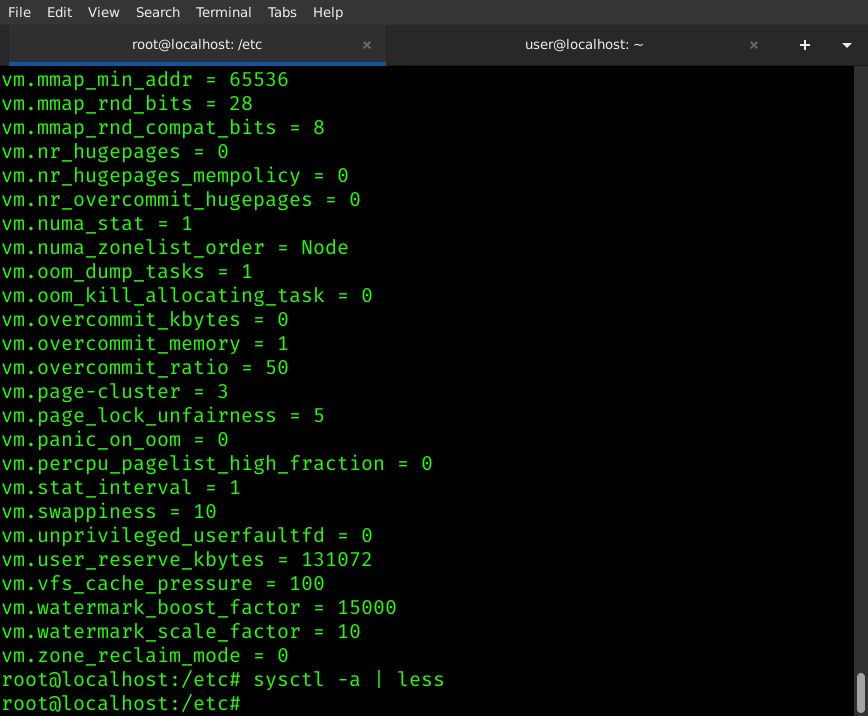
Howto: List ALL Current Values (You Can Change Any Of These)
sudo sysctl -a
Example Output Of sysctl -a:
(The above shows all possible ‘keys’ or parameters we can manipulate / configure)
Make Above List Easier To Read With ‘less’: sysctl -a | less
Test Single Kernel Parameter
We can make our changes automatically load every boot, by editing configuration file: /etc/sysctl.conf (Pop!_OS, Debian Based), /etc/sysctl.d directory location for Arch/Manjaro + )
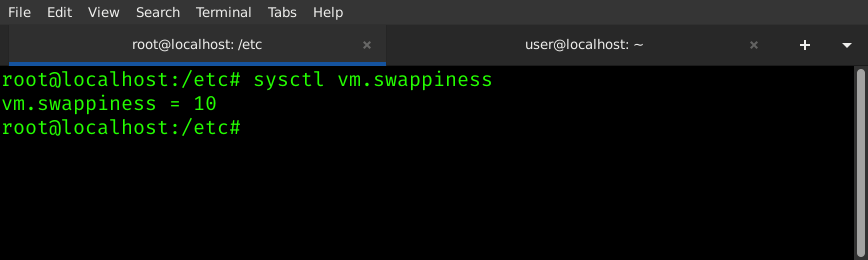
BUT… Before modifying sysctl.conf file (or file in /etc/sysctl.d), we could check individually for the variable (verifying existence).
Run:
sysctl vm.swappiness
The above command returns (if it exists) what the value is.
Example:
Note above screenshot returns my case, vm.swappiness = 10
This figure, the ’10’, represents the ‘redline‘ percentage of free memory, before activating swap.
What you say? 🤔 “swap”? Many Linux users have a partition or file aside known as the <swap>.
This “swap space” helps take the burden off your device, when hardware use is more intensive.
As rule of thumb, create swap space roughly the size of total ram.
10% free memory left before swap? 🤔
Sounds low (running out of resources can lead to a crash).
Change this to something higher, to activate swap space before 10% memory.
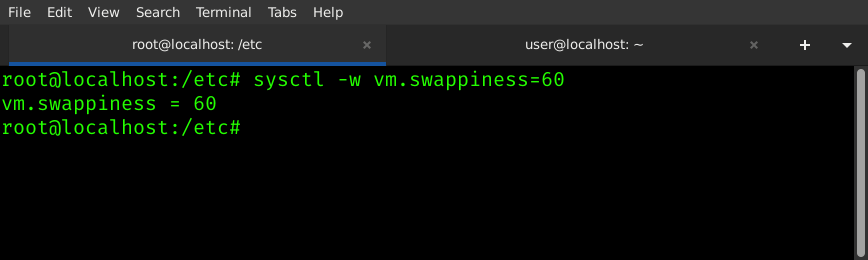
First, you might want to test out your intended line (changes to 60% free memory for swap).
It’s an easy command:
sudo sysctl -w vm.swappiness=60
Example:
What Does The Above Command Do? This changes the current wait from 10% remaining memory up to 60% memory free (when swap will be activated).
This means my older machine will be able to make use of the benefits of swap, much sooner.
Adding Settings To Sysctl.conf
You can follow the above steps to find changes you might wish to make. Write down the key and value. In our case, we need to add:
vm.swappiness=60 # careful not to use any spaces above
Our next step is adding this new change to /etc/sysctl.conf (on Debian / Pop!_OS), in order to have it start for us every boot.
OPTION #1
One method would be adding out line using VIM or GNU/Nano editors.
Just as well you could open your favorite GUI editor.
OPTION #2 (Quick Bash Lesson)
We can use a simple line of bash to add each new line easily from the commandline! 🙂
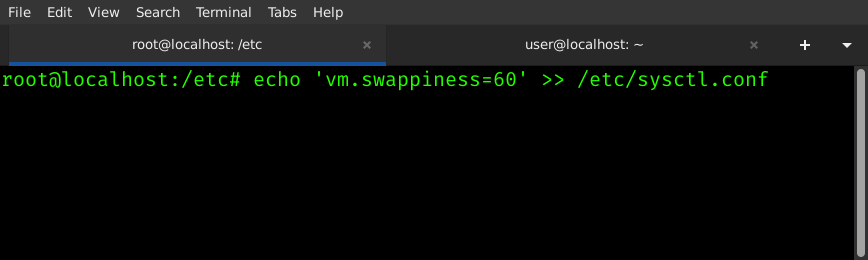
Running the following line will add vm.swappiness=60 to our /etc/sysctl.conf file:
sudo echo ‘vm.swappiness=60’ >> /etc/sysctl.conf
To Make This Tutorial Approachable To Everyone, Let’s Break Down The Command:
How The Command Works:
sudo creates superuser privileges. Anything run after ‘sudo’ will be run as root.
echo sends ‘vm.swappiness=60’ to the standard output – basically meaning echo will print the segment in quotes after to the screen
>> takes the output from previous command (echo) and sends it to the end of the /etc/sysctl.conf file.TIP: If you were to use a single > it would OVERWRITE the file. Using (2) >> APPENDS the end of a file
The filename is at the end here, preceeded by the >> which appends the location after it.
TIP: Experiment using the above information, to create new command combinations. Utilize the ‘>>’ to create new logging features for your scripts.
Adding Additional Changes To Sysctl.conf
Add as many changes as you need to /etc/sysctl.conf. Follow previous steps, replace ‘vm.swappiness=60’ with each new change you wish to add.
Questions / Comments Welcome: It Might Help Someone Else Too.
Our example change activates swap before the previous 10% memory, up to 60% to use swap.
A Few Security / Privacy Related Lines For You To Try! (Desktop – Not Router)
Or, optionally, reboot your system to load the sysctl file.
Always a good idea to test out your new options before attempting to load new sysctl options at boot (see above for testing).
I may add more to this, including more details, including at the (public) Gitea Onion..
Thank you for visiting! If you would like to help with coffee/sdcards/small hardware costs for the channel/blog, I’d love that. Either way, I sincerely appreciate Likes, Shares and Comments! Thank you. 🙂
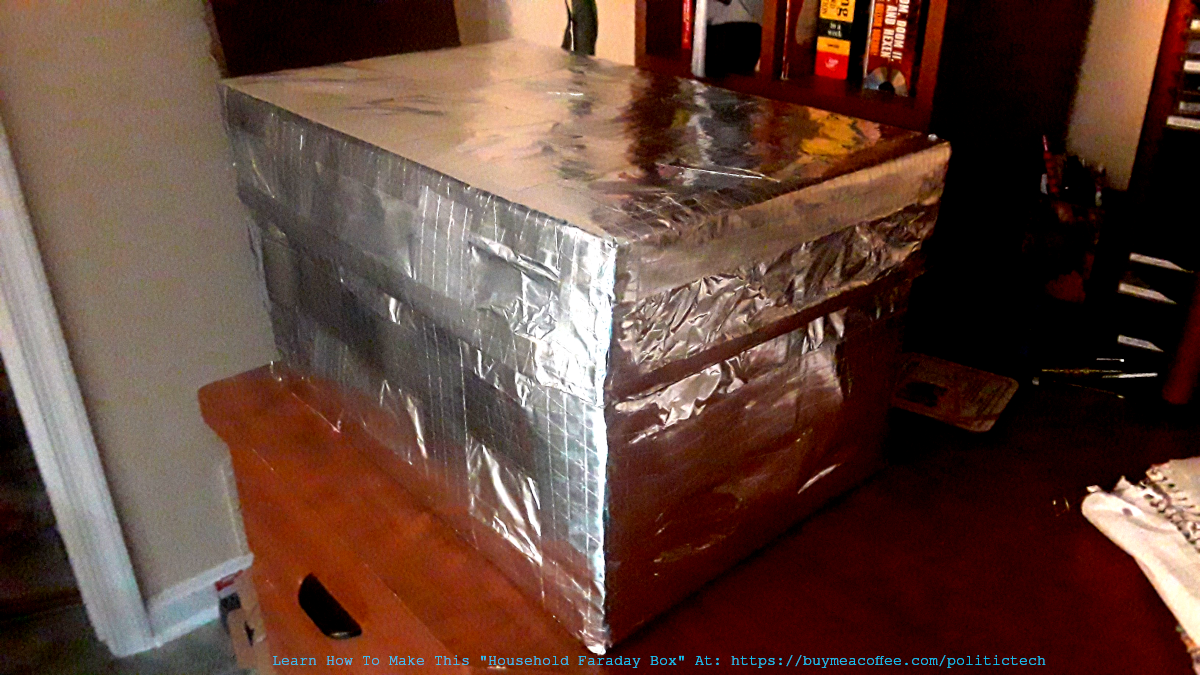
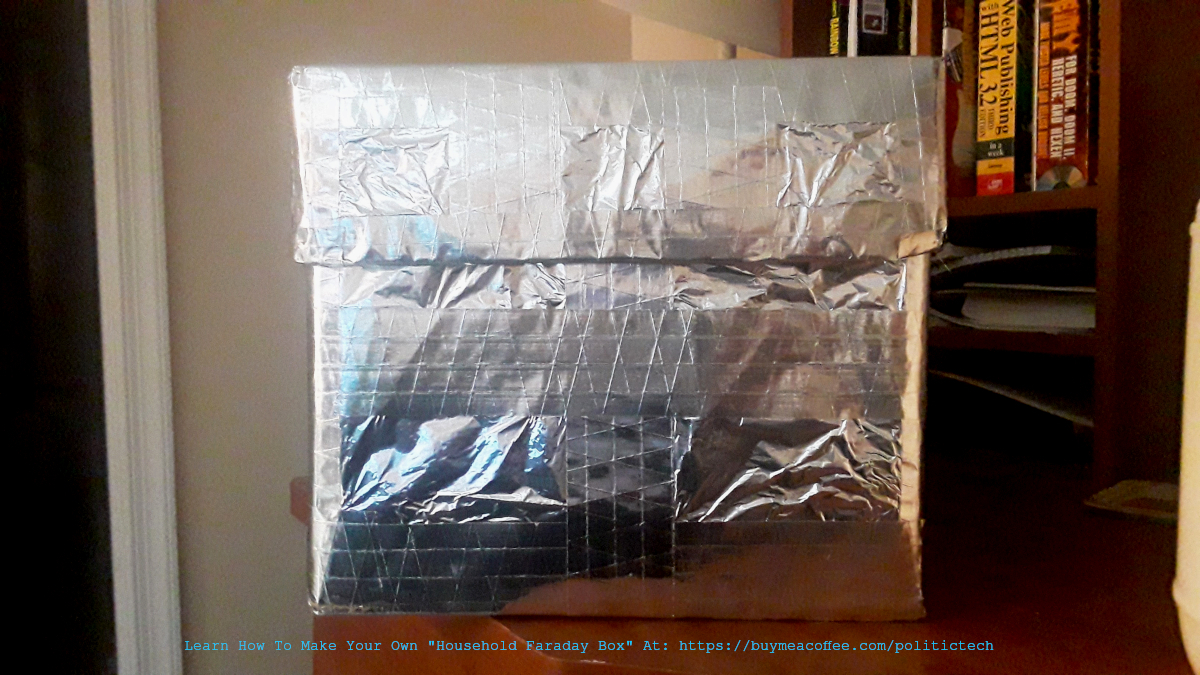
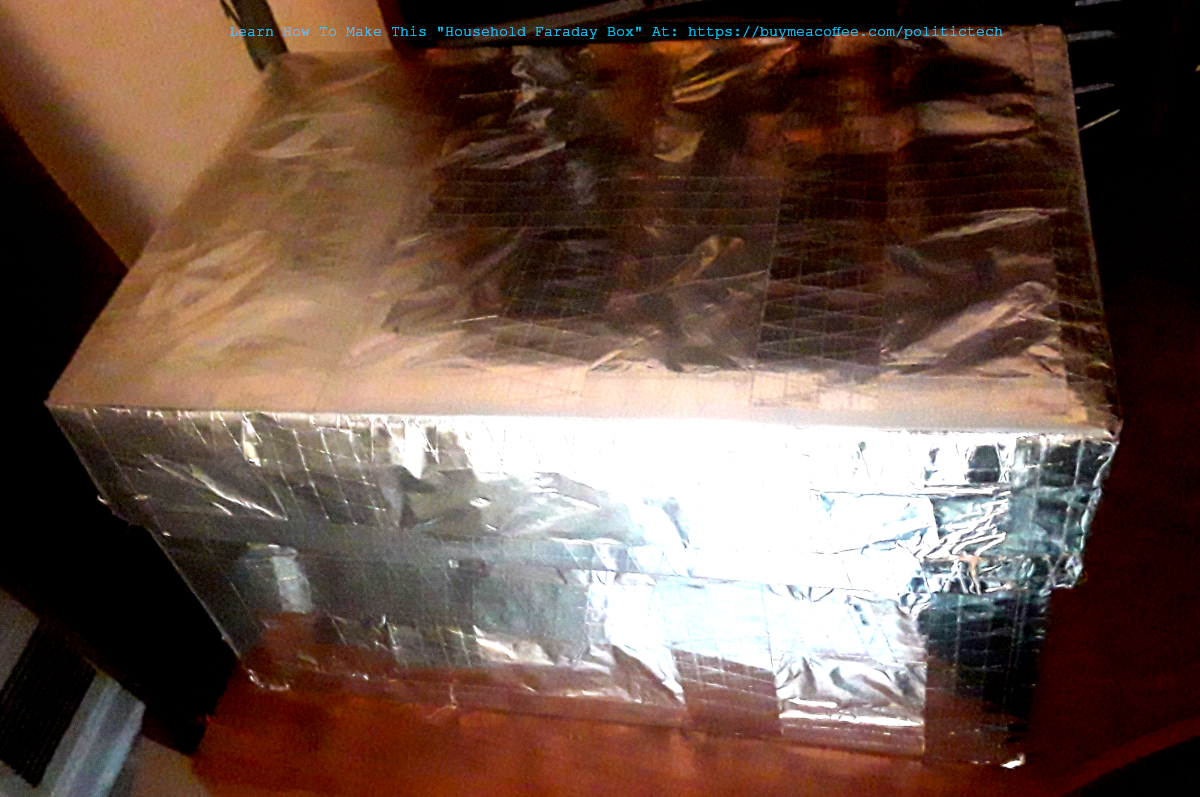
TIP: Tin foil is used here, to make this guide more accessible – and (obviously), it works (see test video).
If you like, choose something more heavy duty if you have it on hand (for more hardened protection), better yet, copper mesh (smaller the holes, the more spectrum blocking).
We explore signal blocking, a privacy bonus (identifiers cannot be captured without signal). Faced a serious direct proximity EMP attack, don’t expect tin foil to prevent damage.
The more conductive, the more effective the protection (for both privacy and EMP related protection). This guide uses household materials to allow just about anyone to follow. Additional layering, and / or use of more conductive material strengthens protection. The choice is yours! Copper is an excellent choice over aluminum.
Halfway through construction, we do a small test to check our progress.
This is about 2 layers in (suggest 4 layers if using aluminum foil).
What’s This Thing For?
Blocking Radio / Electromagnetic Energy
Privacy (Blocking Cell Phone Or Other Device From Sharing Identifiers, BLE, WiFi, Cellular, etc)
Offers Protection Against EMP (Depending On Power, Proximity, Material Used)
PREVIEWS OF FINISHED “HOUSEHOLD FARADAY BOX”:
The above pictures detail what a finished “Household” Faraday Box may look like. It is in fact the one I worked on.
I will be detailing more pictures of the process, including how I layed the HVAC foil tape in a coming post.
Thank you for visiting! If you would like to help with coffee/sdcards/hardware costs for the channel/blog (ex: video rendering killed hard drive Jun 2022), I’d love that. Either way, I sincerely appreciate Likes, Shares and Comments! Thank you. 🙂
Coming Up Over The Next Few Videos We Will Look At Online Options, Linux Security / Radio
UPDATE: This post updated March 23, 2022 to include addition information on ‘trilateration’ location tracking. After sharing previews.
☕ ❤️ This post thanks to monthly Supporters: Greg, Tammy, and warm Welcome to Francisco! Who joined as a monthly Coffee member today. 😀
Hey friends,
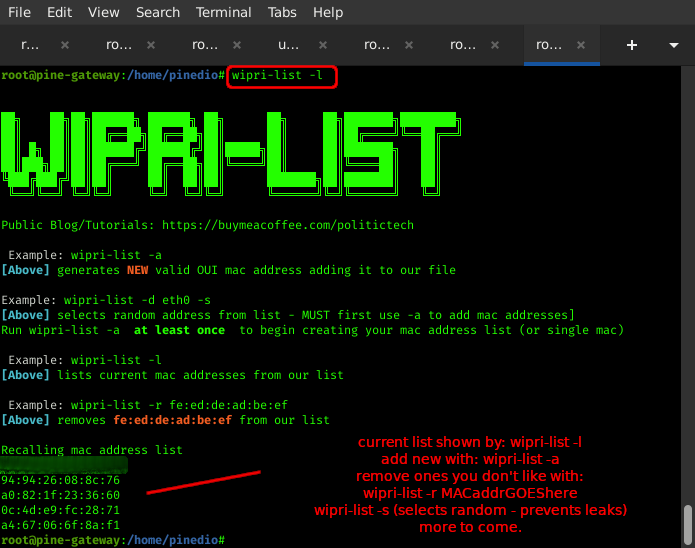
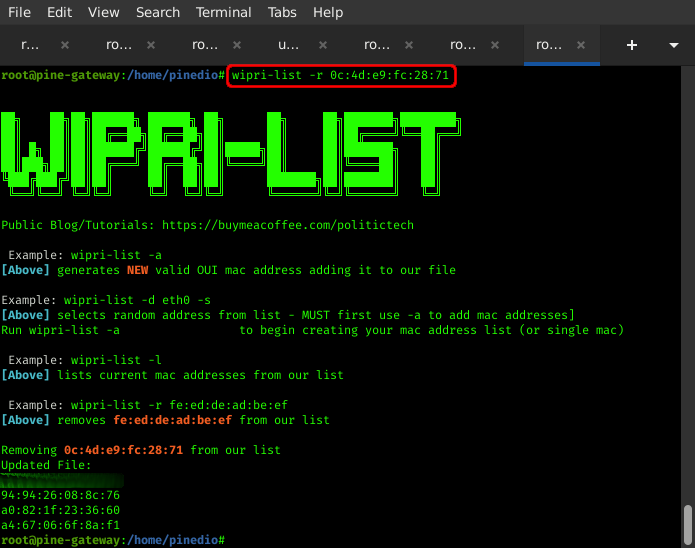
Weeks ago I shared a couple people a sneak peaks of: wipri-list.
A new (optional) command inside WiPri (download latest on our 🧅🔐 Gitea Onion – use Tor Browser to access)
Managing many Linux devices had me annoyed at the fact even I did not recognize my own devices throughout my networks (using WiPri). Thankfully, Linux makes creating solutions easy! I still wanted the benefit of valid yet random mac addresses, but this time, those I could recognize.
One solution I had was to create quasi-permanent MAC address lists. To allow users to use -a flag to create and add (as many as they like) new MAC addresses to this list. -r to remove individual MAC addresses, -l to list, -s to set a randomly chosen mac from the list.
And I incorporated the mac leak prevention concept (created for wipri) into this in order to prevent mac address leaks. This is not to say you can’t use another mac address changer on top if you wish (but wipri will ensure wipri mac’s stay set).
If you wish to have a single permanent false mac address for a machine, simply run wipri-list -a to create the first mac address, and then you will have a single, permanent random, yet valid mac address.
And that is wipri-list. See the video for more general tips on wireless privacy.
For example I haven’t had mac address leakage with it (as intended), but you can still set NetworkManager to ‘random’ if you like – it won’t interfere.
The concept as well was mentioned as something of interest by a couple commenters. I always welcome good ideas, and if I think enough people may want to use something, I may go for it! (comments, question or suggestions, welcome).
Looking forward to sharing new ideas, scripts, and images.
(To everyone who follows, and Shares. You’re a big help. The algorithms don’t always share unique content. Following is free, and allows you to optionally receive most unique posts by email)
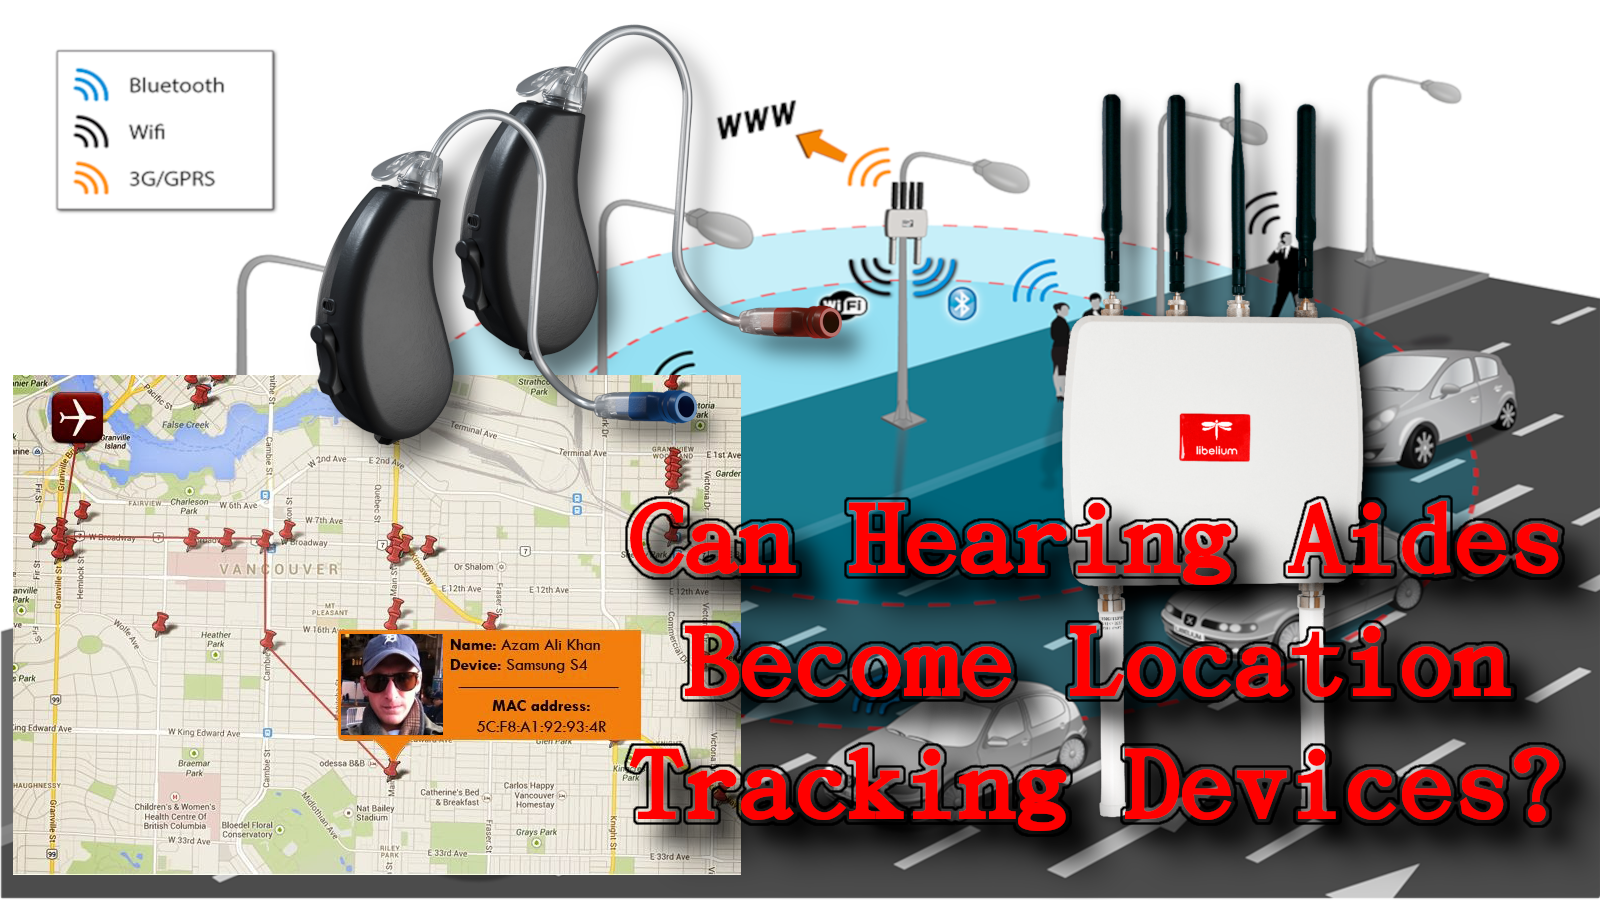
Did you know Department Stores and many other locations around your area are constantly logging your current mac address, along with other identifiers like signal strength (used for trilateration: explained below)?
These mesh-like wireless tracking device networks work in close cooperation with your phone apps, communicating with “ultrasonic audio beacons”, to send advertisements to your phone (sometimes from your TV!), based on what isles you idle, when inside a shopping store?
Yep. It’s true.
And there is much more to this story…
Watch below at your choice of mirrors and don’t forget to Share this article/video!
TODAY: WIRELESS PRIVACY TIPS + THOUGHTS
CLICK IMAGE FOR PEERTUBE (DECENTRALIZE/FEDERATED):
Remove Specific MAC Address From List (wipri-list -r 00:00:00:00:00:00)
Setting A Randomly Chosen MAC From List + Protect It
With this wipri-list -d [device] -s flag, you can have 1 or as many mac addresses in your list as you like. In this example, one is in the list: installed at boot, this creates a single quasi-permanent mac for this machine. If a user creates a longer list, each reboot (or service restart) selects a new random from the list.
For now, that’s as simple as it gets. WiPri is still being updated (adding updates to Gitea onion the other day – older versions on Github/Gitlab; Always suggest the newest from Gitea Onion).
I’m taking into consideration other unmentioned methods of tracking, and putting some into play.
Signal Strength -> Direction ->
Location
In the video we cover briefly the subject of ‘trilateration’. I wanted to discuss it shortly here to explain concepts behind -a and -s flags.
Trilateration is where a wireless (bluetooth, cellular, wifi) device’s location is pinpointed by looking at the 3 receivers with the strongest RSSI signal strength.
Wireless Signal Strength Measurements
Various Nearby Devices (Within Range)
“Trilateration”: 3 Wireless Devices Carrying Strongest Signal Location
Trilateration
From here, location determination of a given WiFi/Bluetooth/Cell phone device determined by the “3 closest receivers”.
The location of said device is normally likely in the middle of the 3 carrying the strongest signals to device in question (see above example diagram).
These sensors/receivers/towers collate signal strengths measure/share data in a cloud-like fashion, coordinating measurements with other identifiers (such as current mac address), to further isolate location. Similar to techniques used to catch those operating on Ham bands who aren’t licensed.
Hence, original concepts in WiPri: options like -a flag, are offered to perform specialty functions: continuously changing valid OUI mac addresses, at continuously changing times/addresses.
In this way, trilateration + static mac address tracking can be mitigated (experimental). Along with other features not yet mentioned.
This is where the -s (signal continual randomization) idea came from (-a flag incorporates with: mac + hostname + signal: Experimental, but functional).
Continued…
Example of how -a flag on WiPri attempts to ‘confuse’ (experimental):
(-a ontinuously changing simultaneous hostname + mac + signal strengths)
This is not a feature most people need, but was one I wanted to play with, and could serve traveling (ex: connecting to various networks + sharing hostname is not privacy – many companies share data. If signal, hostname, mac change simultaneously, this can at least (in theory) make tracking harder). (Has been tested to vary signal RSSI)
wipri -d [deviceHere] -s is another option. This allows you to set a random signal strength changes. Flags make wipri commands handy to combine within other scripts.
That is a big reason wipri is flag based: to make it easy for you to add combinations at will to custom scripts.
Needless to say the signal strength continual randomization is considered experimental, a “fun” feature. And has been tested.
You can Download WiPri + WiPri-List and install using included install.sh script (boot start is optional, or select command use only).
Download WiPri / WiPri-List
DOWNLOAD OPTION #1.) Simply open THIS LINK in Tor browser To Download. That’s it.
———————————————————————- 💖 🤗 SUPPORT 💎 (If you like this you can now Monero directly below) ❤️ M0NER0: 48qtspi5En44mJZLeiMoHYFEmuJfQYb5DLQxLDr7d1NXc53XaAvoT8PS3wBrhEc3VY1wxu5Rgw6oKBYgahpSAYnpHntbQNM 💳 🎁 EXTRAS: Support here for something in return – like your own privacybox: all in one encrypted pastebin + Nextcloud Tor Hidden Service Server/router. 🤑 💵 CASHAPP: $HumanRightsTech ❤️ 🪙 💎 Membership: private Nextcloud Tor Hidden Service “☕ coffee room” chatroom + file share, early/extra access, more ———————————————————————- 📲 FOLLOW:⏬ ✍ 🗒 MASTODON 🐦 TWITTER 📺 🎞 PEERTUBE 📺 🎞 BITCHUTE 📺 🎞 ODYSEE 📺 🎞 YOUTUBE ———————————————————————-
🖇️ LINKS / PUBLIC SERVICE 🔍
———————————————————————- 🧅🔐 GITEA SERVICE (.onion):Books, Code/Scripts, Wiki, more (make a repository) 🧅🔐 PASTEBIN (.onion): options- password protect, zk-256bit, “Burn After Reading” + more (use Tor Browser for .onion’s) ——————————————————————— ✉ CONTACT ————————————————————————- THANK YOU for Sharing. ————————————————————————- If you aren’t registered for Odysee I’d love to see you over there. Use my invite link: https://odysee.com/$invite/@RTP ———————————————————–
SUPPORTER REWARDS
❤️ If you ever Support 6 ☕☕☕☕☕☕ coffees (whether 1 at a time, however, any period of time), or ❤️ monthly members 6+ months, and interested in supporter selfhost rpi image (.img) “extras“, contact me.
I offer unique support incentive “extra” for those who ☕ ❤️support this Human Rights work. Allowing more time, work, resources, code, servers.
At this time my plan is to keep making it better, finding new ways to dedicate more time! ❤️ I’m working on various things, almost everything (currently) public. Some not mentioned.
Here to teach solutions using Linux, FOSS, Privacy, and Human Rights topics.
Thank you for visiting! If you would like to help with coffee/sdcards/hardware costs for the channel/blog (ex: video rendering killed hard drive Jun 2022), I’d love that. Either way, I sincerely appreciate Likes, Shares and Comments! Thank you. 🙂