DISCLAIMER: Below I created a tutorial on ‘flashall’ method to get up and running with this firmware. I include 2 outside videos at the bottom for those who prefer GUI applications for upgrading firmware.
Modem recovery firmware available here, in case you mess up.
FLASHING MODEM FIRMWARE
Before following below, make sure to first install adb / android-tools. Required for ‘flashall’ script.
(see below screenshot to see above commands in action. Make sure to download the package.tar.gz into the ‘helpers’ directory, to allow ‘flashall’ to make use of it.)
After this, you will notice the modem going ‘down’. Then it will reappear / come back alive (reboots).
If you get an error, it can’t hurt to try ‘flashall’ again.
Just be sure you have android-tools / fastboot, and extract Biktor’s firmware into the same directory as tools/helpers (the location of the flashall script).
When all is successful, you should see a message from a dedicated number telling you about the success of your new modem firmware.
Notice problems with modem disappearing? Take a look at recommended settings here.
UPDATE: OUTSIDE VIDEO GUI RESOURCES BELOW
In this article I opted to share a quick commandline route.
For those who prefer a GUI tool (to upgrade the firmware), below I embedded 2 videos on this.
Scroll down to take this route.
RELATED: FIRMWARE UPDATER ON POSTMARKETOS
(Below offers 2 separate videos on the same tool – watch whichever you prefer.)
Who Should? For the few who love the idea of a Linux computer terminal in their pocket, more than they do a phone.
With a keyboard case, you can achieve over a full day of battery, carrying an additional 6,000 mAh charging battery. Placing your Pinephone into the keyboard case, allows it to attempt to charge via the pogo pins.
(there are some drawbacks to the keyboard case: you have to be careful not to attempt to charge the usb-c on the Pinephone, while it is plugged into the keyboard case)
Outside that, I would only recommend to the most hardcore of Linux nerds. Those who want to be part of the Linux mobile development process.
Too many Android users expect the same performance, apps, battery life… those people are surely to be disappointed.
On the Linux end, most apps you run on your desktop can run on the Pinephone.
On the other hand, without Pine64 creating an affordable Pinephone (original) project, we would not have near as large a Linux mobile community.
Purism also has played a big role in Linux mobile development, with Phosh (interface shown in video).
Should you get the Pinephone?
This is something only you can answer for yourself.
If you have no interest in development process, it’s probably not for you (at this point).
Pinephone has been my daily driver for 2 years now.
Today let’s talk a bit about what are commonly referred to universally as: “Stingrays” (popular model), and for Linux phone (Pinephone tested) users, sharing a small service for “4G Only” persistence (every boot): here).
Why? After noticing downgrades, wanted to see if it will affect my service over the long run (good coverage). Opted to try “4G only” for a while.
4G only restricts 2G / 3G and could cause service interruption during moments lacking 4G availability.
Includes tips for Android users. iPhone, not having as many options, does carry a “4G Only app“.
Cell Site Simulators (examples: “Stingrays”, “IMSI Catchers”): False Cell Towers appeal as “strongest signal in the area” for phones in nearby area (ex: 10,000 phones per device in some cases). Once connected, phone location can be tracked, and on lower security (ex: 2G), SMS / calls can be more easily captured)
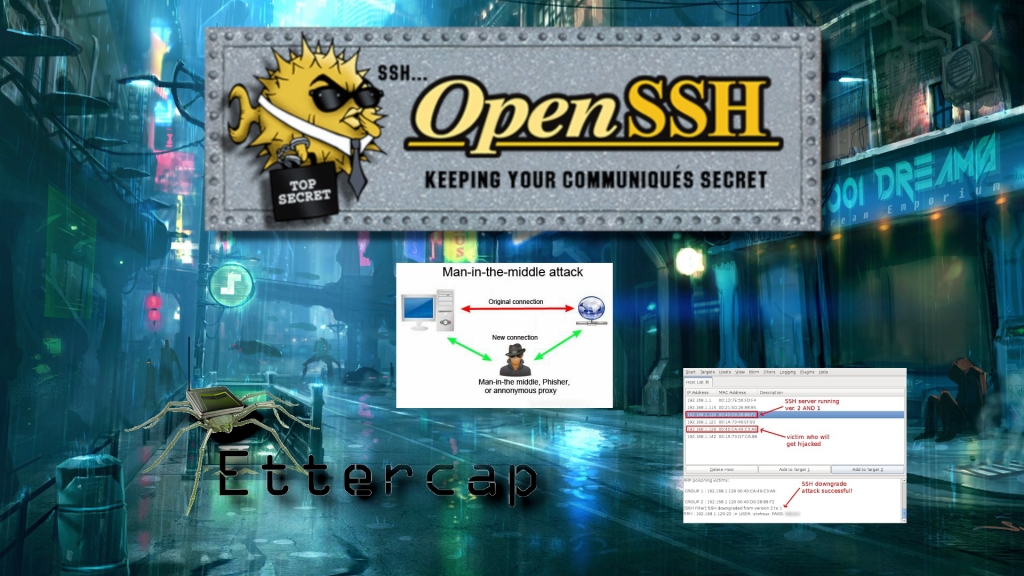
SUMMARY:most Cell Site Simulators rely on downgrade attacks to cause your phone to connect to the less secure (encryption) 2G services (and other times 3G). We talk about how to mitigate for Linux phones (Pinephone service), Android, and iPhone (briefly).
INTRODUCTION
Video (older) introducing an Android tool for detection and mitigation of “cell site simulators”.
A basic introduction to what these devices are designed to do (mimic cell towers), and what various models may look like (including homemade), from the smallest (fitting in the palm of the hand), to the flying…
Downgrading phones to 2G service makes content easier to intercept (ie: calls and SMS txt, due to weak security in the 2G).
4G Cell Site devices run more expensive (comparing to 2G / 3G), generally offering location tracking.
Previously, price quotes (released a couple years back) marked “Hailstorm” devices for over $450,000.
Ultimately, for both criminal and official purposes, most rely on “downgrade” attacks.
Some may notice 4G blocked during certain areas of protest.
See: here, here, and here as examples where 4G was blocked during protest. Nearly all serious protests deal with this, (possibly) forcing connection to cell site simulators.
VULNERABILITY: SYMPTOMS OF ATTACK (Then Again… There Aren’t Always Signs)
Quicker than normal battery drain (push max battery usage)
High power usage forced on phones (amplification can allow farther operation distances)
Downgraded service to 2G, 3G (from stable 5G, 4G)
Service disruptions (problems sending SMS txt, calls, internet)We should ask ourselves: Why is there no tower provider authentication, to protect our phones from these devices? If providers desired so, it would be so.
Why Do Downgrade Attacks From 4G To 2G, 3G Happen?
Downgrade attacks occur to move phones to a more ‘receptive’ environment.
Since said false malicious cell spy towers utilize downgrade attacks to force all phones in the area to connect to their malicious cell site simulator…
We can attempt to mitigate downgrade attacks by forcing 4G only (keep in mind not all settings are saved after reboot – that is the idea of trying the 4g-only service for the Pinephone service: it forces 4G/LTE only, each reboot)
Set Your Preferred Network Type To LTE Only for 4G only (keep in mind this settings holds until reboot)
iPhone Users: 4G / LTE Only There is a reported 4G only app.
You can also access iPhone service options by following this page.
Pinephone / Linux Phone Users
Today I am writing today to intro a small example “4G Only” Service.
It’s something I wanted on my Pinephone (Linux phone) to prevent downgrade attacks.
Symptoms Of Malicious Intent
Phone jumps from its reliable 4G, down to 2G, or 3G
Phone has service disruption after this connection change
Internet may lose reliability, texts and calls may show issue / stalling
Apps like Android’s “Cell Spy Catcher”: take 24hr to map out all current cell towers (and locations), alerting you to towers which move or behave suspiciously, such as changing tower information, and location (ie: true cell towers are not moving around, changing location 😤)
RELATED STORY: In some areas, attacks could even be of foreign interests, even criminal networks.
Mitigation (For Most Cases / Devices): Force 4G Only.
Sure, settings in the Gnome / Phosh allow you to momentarily selecting 4G only, issue here is, it resets to allow 2g, 3g, 4g on the next boot. This service ensures 4G is the only available service to the modem (during service downgrade attempt).
Setting Up 4g-only Service
The service is simple to setup.
Simply download / clone package from Gitea onion (use torify git clone, or Tor Browser to view and download), and run the install.sh script (using sudo). This moves everything where it belongs, making a new command in our execution path, and enabling the service (by default starting 1st on your next reboot).
If you would like the service to start right away, you can run the command installed:
sudo 4g-only
Or (once running install.sh), you can start the service without reboot by issuing:
sudo systemctl start 4g-only.service
To avoid having to reboot.
What Does It Do?
First detects your current modem location (does change), setting “4G / LTE Only” for that modem, every reboot.
Running:
sudo 4g-only
forces 4g-only from the commandline.
If you need access to 3G as well, there is a single argument:
sudo 4g-only reset
Personally, I recommend 4G-only (not the reset) to prevent connection to these lower services linked to most malicious cell site simulators (note: during downgrade attack you may lose service – but at least you may know why..)
Checking Status Of 4g-only.service
Once installed (after a reboot), you can check the status of 4g-only.service.
sudo systemctl status 4g-only.service
Once you have run the install.sh, you will have 4g only every single boot 100% of the time.
If you need access to 4G + 3G (not recommended for most areas), I added the ability in the systemctl ‘stop’ command of the service.
And so:
sudo systemctl stop 4g-only
Won’t just allow 3G, it keeps 4G preferred.
But for myself, and most people, I do recommend leaving the service as is, allowing 4G Only (not including 3G), if you wish to mitigate downgrade maximally.
If you notice service disruptions on 4g Only, this could be a sign of downgrade attacks. That alone IMHO, can be useful to know.
Will share more options as tested in future (check back).
Hope you find useful. ❤️ 📱 🐧
🙂 Thanks for following this page and spreading the word!
Learning to check SSH fingerprints is a staple for using remote ssh safely. Failure to match fingerprints opens us to potential MiTM.
[ Did you miss ssh writeup Part I? We discuss how default Linux OS hostnames can sometimes give away default password, pitfalls in numerical passwords (changing default passwords should be priority #1).
First we identified the OS by default hostname, then we used a “most common numerical pin number wordlist” to crack the default SSH password in seconds, demonstrating how successful ssh cracking (using Hydra) looks, and offering solutions/advice HERE) ]
INTRODUCTION
Do you accept “new” ssh client key fingerprint prompts without checking them against the server in question’s own key fingerprint?
If you accept ssh key fingerprints (without verification), you may be setting yourself up to be an unwitting victim of a MITM (Man In The Middle Attack).
[This topic is covered in PART II (scroll down for Tutorial]
Additionally in PART II, we swap out weak default password authentication, to a much stronger (passwordless) RSA key authentication login assisted by ssh-keygen (we use to generate strong keys).
After which, we disable the password login option altogether (to prevent brute force attackers), and finally, we restart SSH for all changes to take effect.
As a Bonus, a video covers converting SSH server to a Tor Hidden .onion service, adding additional security/encryption benefits (without need for open ports).
(REFRESHER) PART I:
Part I video is below, covering weak default password examples in real Pinephone operating systems (applying to all Linux / UNIX machines / default logins).
In this scenario, we first scan machines on the LAN (as an attacker would), immediately identifying operating systems by their default hostname. After which we use Hydra (brute force cracker) to run known default username/pin number lists against the SSH server identified OS of our Pinephone.
After demonstrating how easy it can be to identify and crack SSH logins on machines sharing the same connection/LAN, we then go in to tighten up sshd_config settings to prevent future brute force attacks. As well as talk password security.
Today’s Video continues on from this SSHD Config angle.
As the introductory paragraph details, first we check key fingerprints shown by our ssh client against the server side’s ssh key fingerprint. We must ensure these fingerprints match, otherwise we risk MITM attack. Never accept new fingerprints without verifying.
ADD SSH KEY AUTHENTICATION (NO PASSWORD NEEDED)
(ssh more securely)
Have you ever accepted a fingerprint and wished to start over to be sure? (to: delete all saved keys for host / server and reconfirm fingerprint?)
REMOVE PREVIOUS KEY FINGERPRINTS (CLIENTSIDE):
ssh-keygen -R HostHere
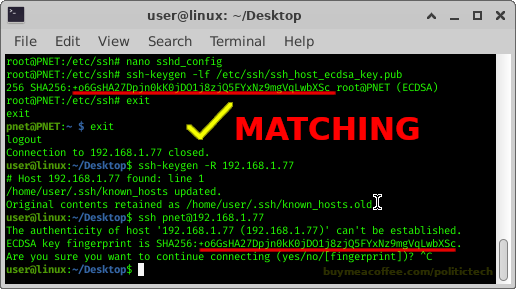
CHECKING FINGERPRINT (SERVERSIDE):
ssh-keygen -lf /etc/ssh/ssh_host_ecdsa_key.pub
NOTE: THE ABOVE COMMAND IS ECDSA. LATEST AND GREATEST ADVICE IS FOR ED25519. CHECK THIS:
ssh-keygen -lf /etc/ssh/ssh_host_25519_key.pub
NEXT:
Connect (from clientside) to our SSH server to check the fingerprint output. Does it match the above “CHECKING FINGER (SERVERSIDE)” output?
See the screenshot below to watch this comparison in action.
SCREENSHOT CHECKING FINGERPRINT (COMMANDS ABOVE):
IMPORTANT: I felt the need to explain 01:56 — do not accept the key (unless you previously recognize it). This key fingerprint acceptance is to demonstrate the plain ‘password: ‘ prompt itself (fingerprint acceptance required to show). Follow below for fingerprint checking instruction (or follow video after 3min).
TIP #1 FINGERPRINT CHECKING: Check the server’s fingerprint from a separate network (if working remotely from it), or if you have physical access + a monitor, even better. By using a separate network to check the fingerprint upon connection, you are compartmentalizing both client checks from one another, further verifying fingerprints match from multiple networks.
Running the fingerprint checking locally (serverside) is always the best method (when possible).
TIP #2 FINGERPRINT CHECKING:
write hosts/fingerprints down , post them on your wall/corkboard/office: no risk in having a written list of your machines hostname/ip + correct ssh fingerprints. This can save you from having to check.
Why? You may one day need to login from a new machine without physical access to the server. Having record can help you check without risking the login/accepting fingerprints remotely.
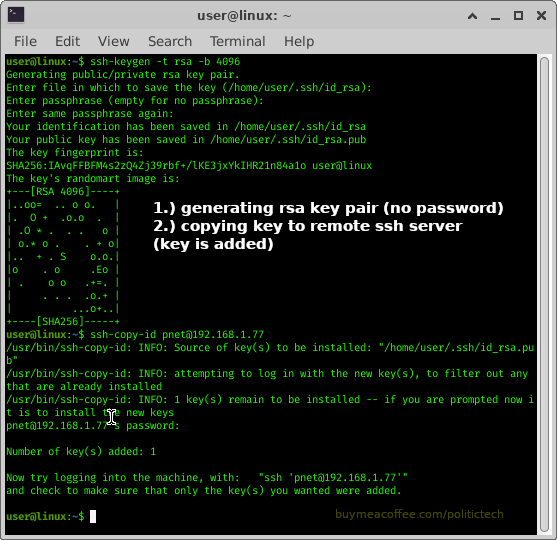
After working on fingerprint checks, we add the key to our server, allowing our client machine to automatically login upon connection.
GENERATE RSA KEY PAIR
ssh-keygen -t rsa -b 4096
PASSWORD-FREE KEY AUTH: MORE SECURE SSH ACCESS
COPY KEY TO SERVER:
ssh-copy-id username@host
SEE SCREENSHOT BELOW FOR ABOVE STEPS IN ACTION
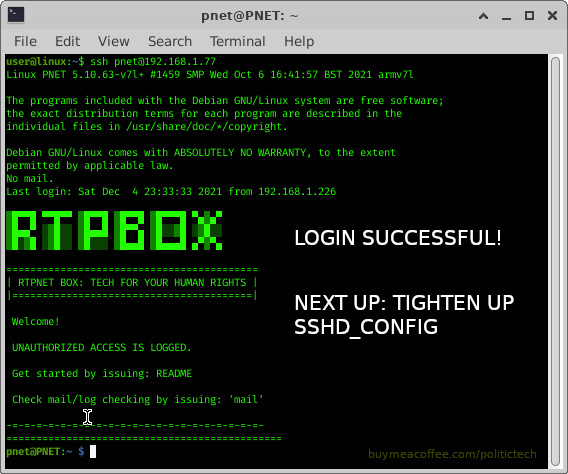
After successfully copying our key, we then connect by ssh to test it, if it lets us in without problem or password, we did it!
TESTING PASSWORD FREE KEY AUTHENTICATION
TIGHTEN UP SSHD_CONFIG (SERVERSIDE)
We add a few more lines to /etc/ssh/sshd_config, ensuring only our machine can login: (disabling password guessing by relying on our newly minted key alone)
/etc/ssh/sshd_config:
PasswordAuthentication no ChallengeResponseAuthentication no UsePAM no
Restarting SSH allows our configuration changes to take effect:
sudo systemctl restart ssh
[Timestamps are found inside the video description]
* BONUS: PART III: Tor SSH .Onion (Hidden Service):
This 3rd (optional) video shows how to setup SSH access as a Tor Hidden Service.
BENEFIT #1: By disabling ssh locally and allowing only the Tor ssh we prevent unknown machines from attempting brute force attacks (if we failed to follow previous videos). The only ssh attempts will be from those you give the onion address to.
BENEFIT #2: Additional layer of end to end encryption between the tor clients on ssh client and server side. Add to this the ssh encryption keys/fingerprints themselves on your client/software side, and you have a much more secure ssh setup.
Comments/Questions Welcome below:
Like content/videos like this? Share it with Linux users (Reddit, Telegram, Discord, IRC).
❤️ If you appreciate content like this and want to ☕ Buy Me a Coffee hit ‘support’ button on: Home Page
Thoughts, comments and any questions welcome below.
Share this post with everyone. Leave your thoughts below.
(Share to help this grow. ❤️ ———————————————————————- PUBLIC COMMUNITY SERVERS: 🧅🔐 ANONYMOUS GITEA (.onion):Books, Code/Scripts, Wiki, more (make a repository) 🧅🔐 PASTEBIN (.onion): anon pastebin pw protect, zk-256bit, “Burn After Reading” + more ———————————————————————- 💖 🤗 SUPPORT (If you like) 🎁 EXTRAS: something unique for your Support here ———————————————————————- FOLLOW: ✍🗒 MASTODON 🐦 TWITTER 📺 🎞 PEERTUBE 📺 🎞 BITCHUTE 📺 🎞 ODYSEE 📺 🎞 YOUTUBE ——————————————————————— ✉ CONTACT ————————————————————————
Supporter Community Early Look (May 13th): Now Public (For Everyone)
(if interested in seeing posts ahead of time, check out the Supporter Site – Free to follow)
The beginning of this writing breezes through subjects found in the video (below), while providing copy and paste convenience.
Later on I begin to include a few sysctl additions that may help mitigate certain attacks.
If what’s on the page isn’t clear, leave a comment, send a message, or check back later and see if anything is new.
Learn The Basics
Get Started
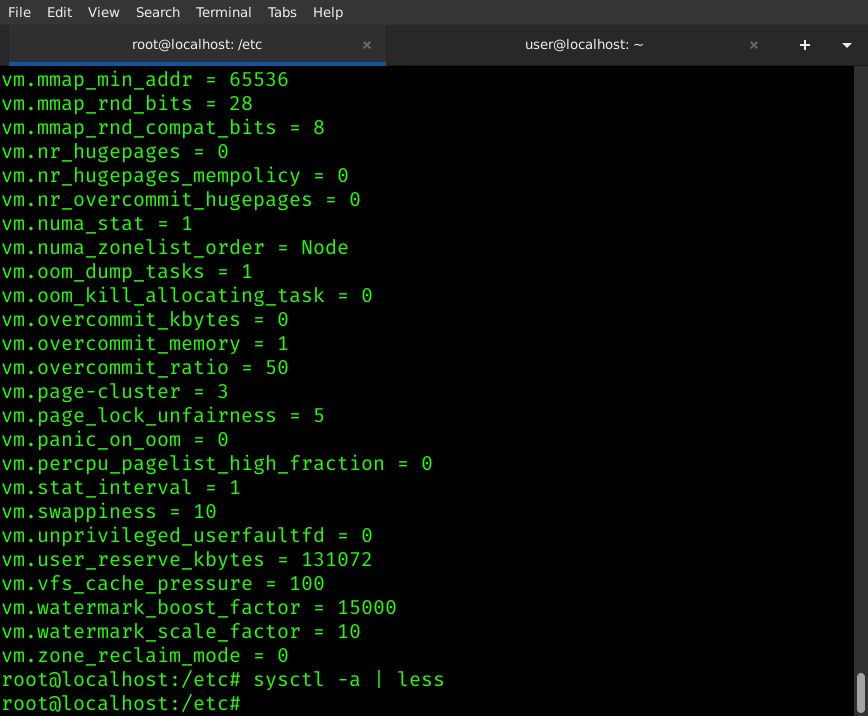
Howto: List ALL Current Values (You Can Change Any Of These)
sudo sysctl -a
Example Output Of sysctl -a:
(The above shows all possible ‘keys’ or parameters we can manipulate / configure)
Make Above List Easier To Read With ‘less’: sysctl -a | less
Test Single Kernel Parameter
We can make our changes automatically load every boot, by editing configuration file: /etc/sysctl.conf (Pop!_OS, Debian Based), /etc/sysctl.d directory location for Arch/Manjaro + )
BUT… Before modifying sysctl.conf file (or file in /etc/sysctl.d), we could check individually for the variable (verifying existence).
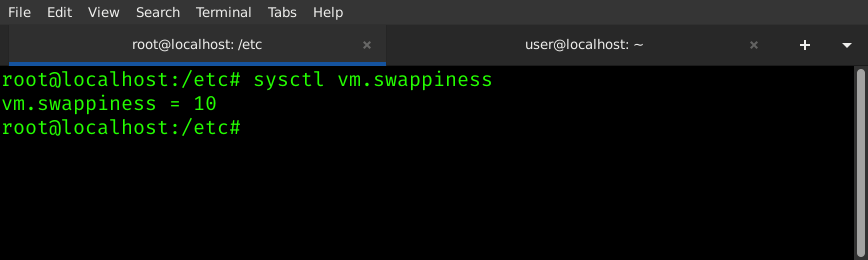
Run:
sysctl vm.swappiness
The above command returns (if it exists) what the value is.
Example:
Note above screenshot returns my case, vm.swappiness = 10
This figure, the ’10’, represents the ‘redline‘ percentage of free memory, before activating swap.
What you say? 🤔 “swap”? Many Linux users have a partition or file aside known as the <swap>.
This “swap space” helps take the burden off your device, when hardware use is more intensive.
As rule of thumb, create swap space roughly the size of total ram.
10% free memory left before swap? 🤔
Sounds low (running out of resources can lead to a crash).
Change this to something higher, to activate swap space before 10% memory.
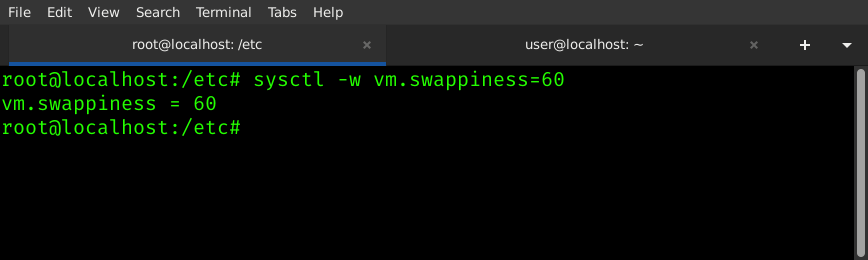
First, you might want to test out your intended line (changes to 60% free memory for swap).
It’s an easy command:
sudo sysctl -w vm.swappiness=60
Example:
What Does The Above Command Do? This changes the current wait from 10% remaining memory up to 60% memory free (when swap will be activated).
This means my older machine will be able to make use of the benefits of swap, much sooner.
Adding Settings To Sysctl.conf
You can follow the above steps to find changes you might wish to make. Write down the key and value. In our case, we need to add:
vm.swappiness=60 # careful not to use any spaces above
Our next step is adding this new change to /etc/sysctl.conf (on Debian / Pop!_OS), in order to have it start for us every boot.
OPTION #1
One method would be adding out line using VIM or GNU/Nano editors.
Just as well you could open your favorite GUI editor.
OPTION #2 (Quick Bash Lesson)
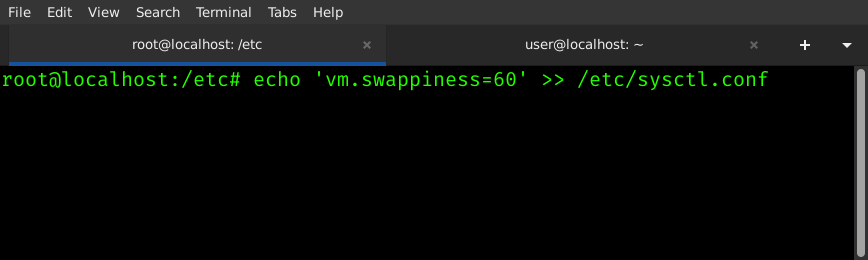
We can use a simple line of bash to add each new line easily from the commandline! 🙂
Running the following line will add vm.swappiness=60 to our /etc/sysctl.conf file:
sudo echo ‘vm.swappiness=60’ >> /etc/sysctl.conf
To Make This Tutorial Approachable To Everyone, Let’s Break Down The Command:
How The Command Works:
sudo creates superuser privileges. Anything run after ‘sudo’ will be run as root.
echo sends ‘vm.swappiness=60’ to the standard output – basically meaning echo will print the segment in quotes after to the screen
>> takes the output from previous command (echo) and sends it to the end of the /etc/sysctl.conf file.TIP: If you were to use a single > it would OVERWRITE the file. Using (2) >> APPENDS the end of a file
The filename is at the end here, preceeded by the >> which appends the location after it.
TIP: Experiment using the above information, to create new command combinations. Utilize the ‘>>’ to create new logging features for your scripts.
Adding Additional Changes To Sysctl.conf
Add as many changes as you need to /etc/sysctl.conf. Follow previous steps, replace ‘vm.swappiness=60’ with each new change you wish to add.
Questions / Comments Welcome: It Might Help Someone Else Too.
Our example change activates swap before the previous 10% memory, up to 60% to use swap.
A Few Security / Privacy Related Lines For You To Try! (Desktop – Not Router)
Or, optionally, reboot your system to load the sysctl file.
Always a good idea to test out your new options before attempting to load new sysctl options at boot (see above for testing).
I may add more to this, including more details, including at the (public) Gitea Onion..
Thank you for visiting! If you would like to help with coffee/sdcards/small hardware costs for the channel/blog, I’d love that. Either way, I sincerely appreciate Likes, Shares and Comments! Thank you. 🙂
TIP: Tin foil is used here, to make this guide more accessible – and (obviously), it works (see test video).
If you like, choose something more heavy duty if you have it on hand (for more hardened protection), better yet, copper mesh (smaller the holes, the more spectrum blocking).
We explore signal blocking, a privacy bonus (identifiers cannot be captured without signal). Faced a serious direct proximity EMP attack, don’t expect tin foil to prevent damage.
The more conductive, the more effective the protection (for both privacy and EMP related protection). This guide uses household materials to allow just about anyone to follow. Additional layering, and / or use of more conductive material strengthens protection. The choice is yours! Copper is an excellent choice over aluminum.
Halfway through construction, we do a small test to check our progress.
This is about 2 layers in (suggest 4 layers if using aluminum foil).
What’s This Thing For?
Blocking Radio / Electromagnetic Energy
Privacy (Blocking Cell Phone Or Other Device From Sharing Identifiers, BLE, WiFi, Cellular, etc)
Offers Protection Against EMP (Depending On Power, Proximity, Material Used)
PREVIEWS OF FINISHED “HOUSEHOLD FARADAY BOX”:
The above pictures detail what a finished “Household” Faraday Box may look like. It is in fact the one I worked on.
I will be detailing more pictures of the process, including how I layed the HVAC foil tape in a coming post.
Thank you for visiting! If you would like to help with coffee/sdcards/hardware costs for the channel/blog (ex: video rendering killed hard drive Jun 2022), I’d love that. Either way, I sincerely appreciate Likes, Shares and Comments! Thank you. 🙂
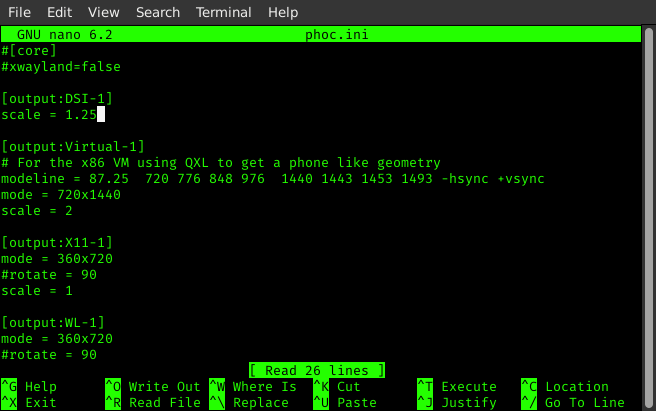
Next edit /etc/phosh/phoc.ini using either nano command or vim (nano shown to help all user levels):
In the above screenshot, we see our phoc.ini config file.
We can see where the white colored cursor is. The 1.25 on that line can be changed to meet your needs. Try 1, 1.25, 1.5, 1.75, 2. All will create a different variation of your interface scaling.
Find a setting that meets your needs.
Today was just a quick tip for permanently changing scaling (held for reboot).
Thank you for visiting! If you would like to help with coffee/sdcards/hardware costs for the channel/blog (ex: video rendering killed hard drive Jun 2022), I’d love that. Either way, I sincerely appreciate Likes, Shares and Comments! Thank you. 🙂
Today, I can feel comfortable recommending Pinetime as a Smartwatch option to those who care about Privacy.
The above sentence may sound a bit odd to read at first. I’m about to explain why I hadn’t been able to explicitly recommended it for privacy (in the past).
To those who missed my previous Pinetimefirst impressions video, I received the open source smartwatch from a family member as a gift.
Mainly, I wanted it to help me track my heartrate goals, and steps during workouts.
Smart devices with data we can ‘own’! It had been at least 10 years since I carried a watch (with smartphones and everything providing time)! And I’m not exactly trusting of most “Smart” devices, especially considering some revelations coming out concerning smartwatch data sharing.
In January (when the first video was made), I knew bluetooth was on (all the time – at that time). This wasn’t such a big deal to me personally, I wanted to use it during workouts mainly… but deep down I always desire a way to turn bluetooth off!
The day has come 🤩
Hearing news of a firmware release/update, I decided to upgrade my firmware.
Better yet, why not make a video out of the process?
PREVIOUS “FIRST IMPRESSIONS” VIDEO CAN BE SEEN HERE.
UPDATE
When I started recording this latest video, I was unaware of one thing: the newest firmware I was installing during video recording (1.9.0) offered the ability to disable Bluetooth.
Great News (To Me Anyways)
Of course you need to turn bluetooth back on anytime you wish to pair with a phone / update firmware, but to me, that’s no big deal. It’s not something you need outside those moments.
Everything else I’m using on the phone (heartrate monitor, pong game, step tracker), is self contained in the watch, not requiring bluetooth connection for my purposes.
Turning Off Bluetooth
Swipe screen right
Enter “Gear” Icon Settings
Scroll Down To Bluetooth:
Next Tap “Bluetooth” (Seen Above)
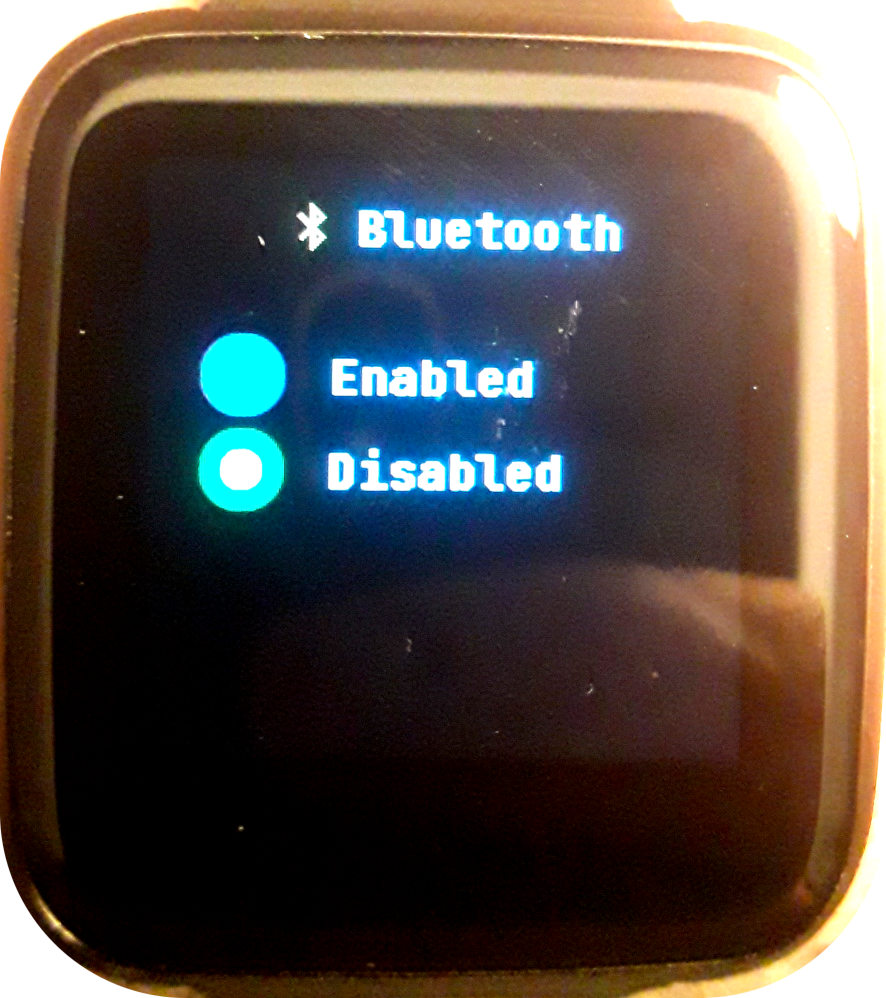
Bringing You To Enable / Disable Bluetooth:
That’s it. It’s now disabled. Make sure to go into these settings to enable it anytime you need to pair or upgrade firmware.
But… Is It Really Disabled? 🤔
Quick Test
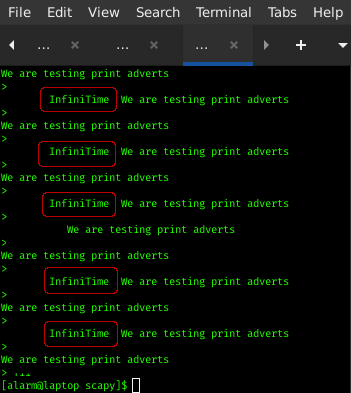
Scapy Python Script: Pinetime Setting: Bluetooth On:
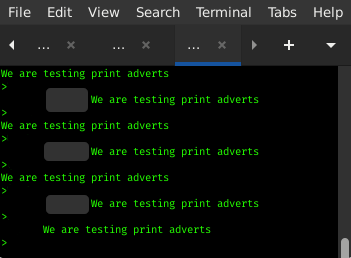
And Now, Pinetime Bluetooth Off: (the grey boxes showing other bluetooth devices, Infinitime not showing up)
No Infinitime Devices seen during sniffing session with Bluetooth Disabled. Off to a good start. 😀
(Greyed out boxes to prevent displaying any local bluetooth identifiers [unrelated to Pinetime but local to me])
Now feel a bit more comfortable wearing it everywhere. And finally can say: it’s more privacy friendly!
Of course if you are paired, bluetooth will be on during that. Don’t forget to re-enable / disable, as needed.
Thanks for reading / watching.
Feel free to leave a comment / question.
Thank you for visiting! If you would like to help with coffee/sdcards/hardware costs for the channel/blog (ex: video rendering killed hard drive Jun 2022), I’d love that. Either way, I sincerely appreciate Likes, Shares and Comments! Thank you. 🙂
Coming Up Over The Next Few Videos We Will Look At Online Options, Linux Security / Radio
UPDATE: This post updated March 23, 2022 to include addition information on ‘trilateration’ location tracking. After sharing previews.
☕ ❤️ This post thanks to monthly Supporters: Greg, Tammy, and warm Welcome to Francisco! Who joined as a monthly Coffee member today. 😀
Hey friends,
Weeks ago I shared a couple people a sneak peaks of: wipri-list.
A new (optional) command inside WiPri (download latest on our 🧅🔐 Gitea Onion – use Tor Browser to access)
Managing many Linux devices had me annoyed at the fact even I did not recognize my own devices throughout my networks (using WiPri). Thankfully, Linux makes creating solutions easy! I still wanted the benefit of valid yet random mac addresses, but this time, those I could recognize.
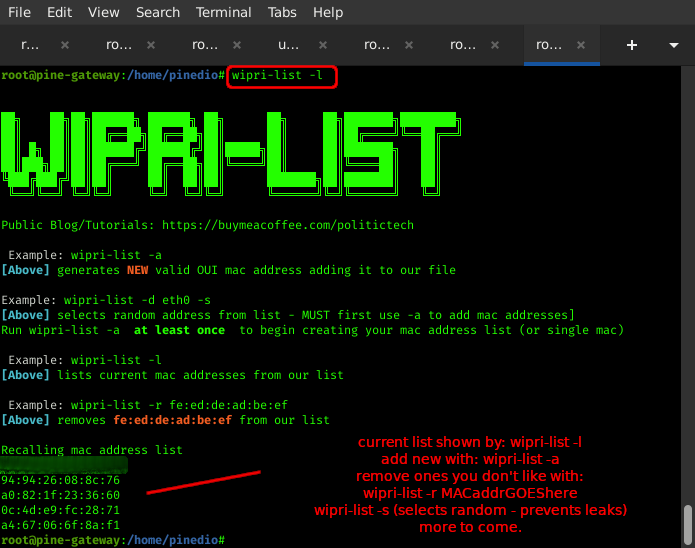
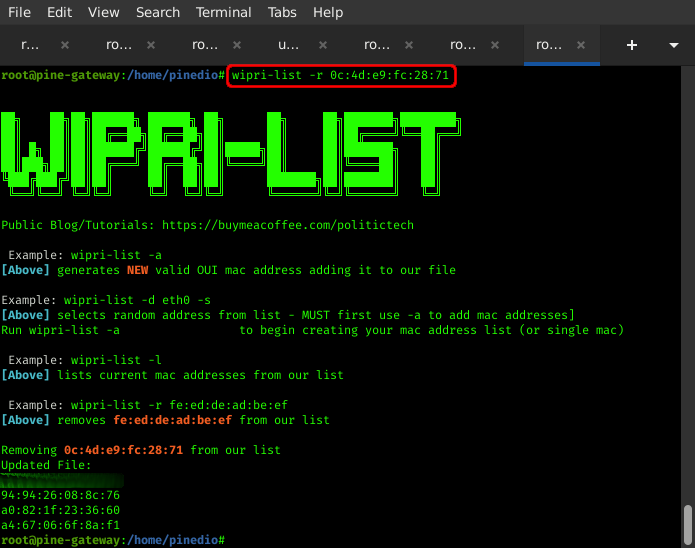
One solution I had was to create quasi-permanent MAC address lists. To allow users to use -a flag to create and add (as many as they like) new MAC addresses to this list. -r to remove individual MAC addresses, -l to list, -s to set a randomly chosen mac from the list.
And I incorporated the mac leak prevention concept (created for wipri) into this in order to prevent mac address leaks. This is not to say you can’t use another mac address changer on top if you wish (but wipri will ensure wipri mac’s stay set).
If you wish to have a single permanent false mac address for a machine, simply run wipri-list -a to create the first mac address, and then you will have a single, permanent random, yet valid mac address.
And that is wipri-list. See the video for more general tips on wireless privacy.
For example I haven’t had mac address leakage with it (as intended), but you can still set NetworkManager to ‘random’ if you like – it won’t interfere.
The concept as well was mentioned as something of interest by a couple commenters. I always welcome good ideas, and if I think enough people may want to use something, I may go for it! (comments, question or suggestions, welcome).
Looking forward to sharing new ideas, scripts, and images.
(To everyone who follows, and Shares. You’re a big help. The algorithms don’t always share unique content. Following is free, and allows you to optionally receive most unique posts by email)
Did you know Department Stores and many other locations around your area are constantly logging your current mac address, along with other identifiers like signal strength (used for trilateration: explained below)?
These mesh-like wireless tracking device networks work in close cooperation with your phone apps, communicating with “ultrasonic audio beacons”, to send advertisements to your phone (sometimes from your TV!), based on what isles you idle, when inside a shopping store?
Yep. It’s true.
And there is much more to this story…
Watch below at your choice of mirrors and don’t forget to Share this article/video!
TODAY: WIRELESS PRIVACY TIPS + THOUGHTS
CLICK IMAGE FOR PEERTUBE (DECENTRALIZE/FEDERATED):
Remove Specific MAC Address From List (wipri-list -r 00:00:00:00:00:00)
Setting A Randomly Chosen MAC From List + Protect It
With this wipri-list -d [device] -s flag, you can have 1 or as many mac addresses in your list as you like. In this example, one is in the list: installed at boot, this creates a single quasi-permanent mac for this machine. If a user creates a longer list, each reboot (or service restart) selects a new random from the list.
For now, that’s as simple as it gets. WiPri is still being updated (adding updates to Gitea onion the other day – older versions on Github/Gitlab; Always suggest the newest from Gitea Onion).
I’m taking into consideration other unmentioned methods of tracking, and putting some into play.
Signal Strength -> Direction ->
Location
In the video we cover briefly the subject of ‘trilateration’. I wanted to discuss it shortly here to explain concepts behind -a and -s flags.
Trilateration is where a wireless (bluetooth, cellular, wifi) device’s location is pinpointed by looking at the 3 receivers with the strongest RSSI signal strength.
Wireless Signal Strength Measurements
Various Nearby Devices (Within Range)
“Trilateration”: 3 Wireless Devices Carrying Strongest Signal Location
Trilateration
From here, location determination of a given WiFi/Bluetooth/Cell phone device determined by the “3 closest receivers”.
The location of said device is normally likely in the middle of the 3 carrying the strongest signals to device in question (see above example diagram).
These sensors/receivers/towers collate signal strengths measure/share data in a cloud-like fashion, coordinating measurements with other identifiers (such as current mac address), to further isolate location. Similar to techniques used to catch those operating on Ham bands who aren’t licensed.
Hence, original concepts in WiPri: options like -a flag, are offered to perform specialty functions: continuously changing valid OUI mac addresses, at continuously changing times/addresses.
In this way, trilateration + static mac address tracking can be mitigated (experimental). Along with other features not yet mentioned.
This is where the -s (signal continual randomization) idea came from (-a flag incorporates with: mac + hostname + signal: Experimental, but functional).
Continued…
Example of how -a flag on WiPri attempts to ‘confuse’ (experimental):
(-a ontinuously changing simultaneous hostname + mac + signal strengths)
This is not a feature most people need, but was one I wanted to play with, and could serve traveling (ex: connecting to various networks + sharing hostname is not privacy – many companies share data. If signal, hostname, mac change simultaneously, this can at least (in theory) make tracking harder). (Has been tested to vary signal RSSI)
wipri -d [deviceHere] -s is another option. This allows you to set a random signal strength changes. Flags make wipri commands handy to combine within other scripts.
That is a big reason wipri is flag based: to make it easy for you to add combinations at will to custom scripts.
Needless to say the signal strength continual randomization is considered experimental, a “fun” feature. And has been tested.
You can Download WiPri + WiPri-List and install using included install.sh script (boot start is optional, or select command use only).
Download WiPri / WiPri-List
DOWNLOAD OPTION #1.) Simply open THIS LINK in Tor browser To Download. That’s it.
———————————————————————- 💖 🤗 SUPPORT 💎 (If you like this you can now Monero directly below) ❤️ M0NER0: 48qtspi5En44mJZLeiMoHYFEmuJfQYb5DLQxLDr7d1NXc53XaAvoT8PS3wBrhEc3VY1wxu5Rgw6oKBYgahpSAYnpHntbQNM 💳 🎁 EXTRAS: Support here for something in return – like your own privacybox: all in one encrypted pastebin + Nextcloud Tor Hidden Service Server/router. 🤑 💵 CASHAPP: $HumanRightsTech ❤️ 🪙 💎 Membership: private Nextcloud Tor Hidden Service “☕ coffee room” chatroom + file share, early/extra access, more ———————————————————————- 📲 FOLLOW:⏬ ✍ 🗒 MASTODON 🐦 TWITTER 📺 🎞 PEERTUBE 📺 🎞 BITCHUTE 📺 🎞 ODYSEE 📺 🎞 YOUTUBE ———————————————————————-
🖇️ LINKS / PUBLIC SERVICE 🔍
———————————————————————- 🧅🔐 GITEA SERVICE (.onion):Books, Code/Scripts, Wiki, more (make a repository) 🧅🔐 PASTEBIN (.onion): options- password protect, zk-256bit, “Burn After Reading” + more (use Tor Browser for .onion’s) ——————————————————————— ✉ CONTACT ————————————————————————- THANK YOU for Sharing. ————————————————————————- If you aren’t registered for Odysee I’d love to see you over there. Use my invite link: https://odysee.com/$invite/@RTP ———————————————————–
SUPPORTER REWARDS
❤️ If you ever Support 6 ☕☕☕☕☕☕ coffees (whether 1 at a time, however, any period of time), or ❤️ monthly members 6+ months, and interested in supporter selfhost rpi image (.img) “extras“, contact me.
I offer unique support incentive “extra” for those who ☕ ❤️support this Human Rights work. Allowing more time, work, resources, code, servers.
At this time my plan is to keep making it better, finding new ways to dedicate more time! ❤️ I’m working on various things, almost everything (currently) public. Some not mentioned.
Here to teach solutions using Linux, FOSS, Privacy, and Human Rights topics.
Thank you for visiting! If you would like to help with coffee/sdcards/hardware costs for the channel/blog (ex: video rendering killed hard drive Jun 2022), I’d love that. Either way, I sincerely appreciate Likes, Shares and Comments! Thank you. 🙂