It’s been over a month of dedicated TailsOS usage (due to main disk dying some bit ago).
I enjoy Tails, will continue using it (as with Debian, Whonix, Qubes, Arch).
But given restrictions found in privacy / anonymity focused operating systems, sometimes we need a longer term solution for working more productively (without driving ourselves crazy).
TODAY’S VIDEO
Decided to do a bit of ‘distrohopping’.
Installed Manjaro with (minimal) XFCE desktop. Downloaded XFCE ‘minimal’ image to try to make better use of older hardware.
Continuing to bring solutions and setup tips for all Linux distros (including Pop!OS).
Ubuntu has always been a tad heavy.
And so, nothing changing here. Will continue introducing ways you can customize your system in ways that protect your privacy, security. No matter the distro you run.
TRY XFCE
Ever get the urge for a full GNU/Linux desktop experience, on a lighter, faster level?
You may like to try XFCE.
Sure, it’s not the ‘lightest’ of all, but certainly lighter than KDE / Gnome.
SCREENSHOT:
This screenshot was taken the day of installation. Nothing has been changed. Wanted to capture the “post install moments” screenshot.
Always been a favorite of mine. XFCE desktop is actually what I’ve run most my years with Linux.
If you run Pop_OS (or any other distro), you can easily install XFCE.
When you add XFCE, it doesn’t automatically delete your old desktop! (you aren’t losing anything – as long as you don’t choose to remove your current)
After installing XFCE there is usually an option to select it at your login screen
It’s lighter than alternatives like KDE / Gnome
Nice option for older machinesThe great thing about Linux: tips here can be pretty universal. Sure, a few package manager commands are slightly different, but it’s generally a matter of either “apt” (Debian), “pacman” (Arch), or “dnf” (Fedora / Redhat / CentOS).
(I try to include command conversions on important tutorials)
TIP: Try out a lightweight XFCE desktop. No matter your operating system, XFCE is likely available.
Simply search your package manager (graphical or commandline) for xfce4, as a start.
Pop_OS / Debian: apt update && apt install xfce4
Manjaro / Arch Based: pacman -Ss xfdesktop
(if any of the above commands are wrong for your system (or you have trouble) comment)
Thanks for following and sharing this on Social Media, Telegram, everywhere.
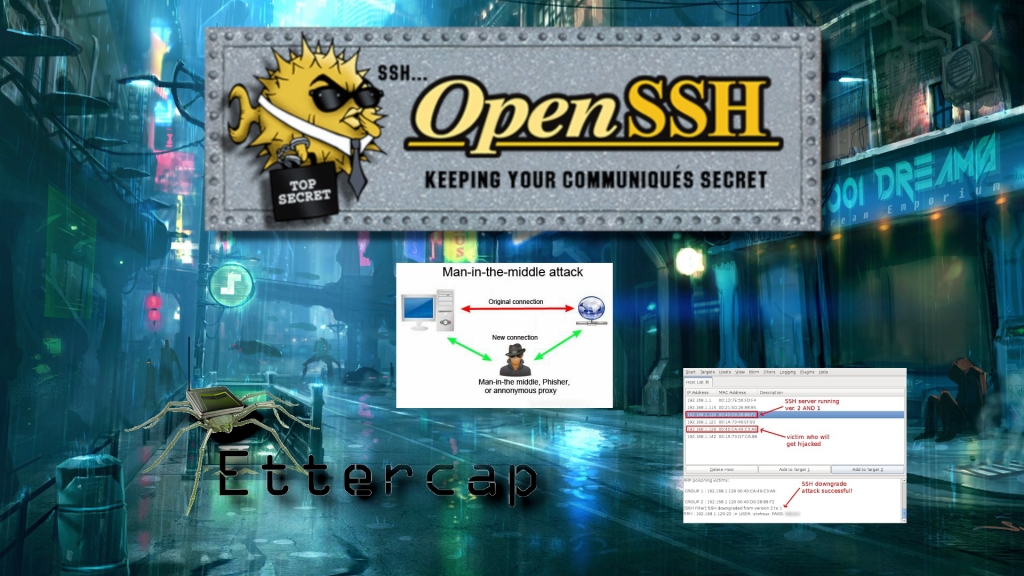
Learning to check SSH fingerprints is a staple for using remote ssh safely. Failure to match fingerprints opens us to potential MiTM.
[ Did you miss ssh writeup Part I? We discuss how default Linux OS hostnames can sometimes give away default password, pitfalls in numerical passwords (changing default passwords should be priority #1).
First we identified the OS by default hostname, then we used a “most common numerical pin number wordlist” to crack the default SSH password in seconds, demonstrating how successful ssh cracking (using Hydra) looks, and offering solutions/advice HERE) ]
INTRODUCTION
Do you accept “new” ssh client key fingerprint prompts without checking them against the server in question’s own key fingerprint?
If you accept ssh key fingerprints (without verification), you may be setting yourself up to be an unwitting victim of a MITM (Man In The Middle Attack).
[This topic is covered in PART II (scroll down for Tutorial]
Additionally in PART II, we swap out weak default password authentication, to a much stronger (passwordless) RSA key authentication login assisted by ssh-keygen (we use to generate strong keys).
After which, we disable the password login option altogether (to prevent brute force attackers), and finally, we restart SSH for all changes to take effect.
As a Bonus, a video covers converting SSH server to a Tor Hidden .onion service, adding additional security/encryption benefits (without need for open ports).
(REFRESHER) PART I:
Part I video is below, covering weak default password examples in real Pinephone operating systems (applying to all Linux / UNIX machines / default logins).
In this scenario, we first scan machines on the LAN (as an attacker would), immediately identifying operating systems by their default hostname. After which we use Hydra (brute force cracker) to run known default username/pin number lists against the SSH server identified OS of our Pinephone.
After demonstrating how easy it can be to identify and crack SSH logins on machines sharing the same connection/LAN, we then go in to tighten up sshd_config settings to prevent future brute force attacks. As well as talk password security.
Today’s Video continues on from this SSHD Config angle.
As the introductory paragraph details, first we check key fingerprints shown by our ssh client against the server side’s ssh key fingerprint. We must ensure these fingerprints match, otherwise we risk MITM attack. Never accept new fingerprints without verifying.
ADD SSH KEY AUTHENTICATION (NO PASSWORD NEEDED)
(ssh more securely)
Have you ever accepted a fingerprint and wished to start over to be sure? (to: delete all saved keys for host / server and reconfirm fingerprint?)
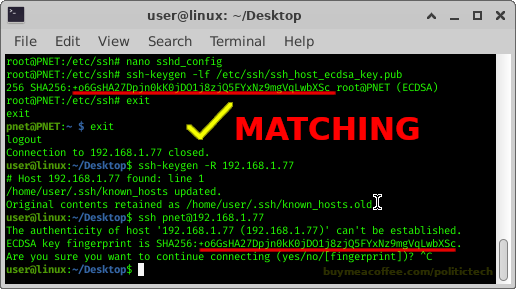
REMOVE PREVIOUS KEY FINGERPRINTS (CLIENTSIDE):
ssh-keygen -R HostHere
CHECKING FINGERPRINT (SERVERSIDE):
ssh-keygen -lf /etc/ssh/ssh_host_ecdsa_key.pub
NOTE: THE ABOVE COMMAND IS ECDSA. LATEST AND GREATEST ADVICE IS FOR ED25519. CHECK THIS:
ssh-keygen -lf /etc/ssh/ssh_host_25519_key.pub
NEXT:
Connect (from clientside) to our SSH server to check the fingerprint output. Does it match the above “CHECKING FINGER (SERVERSIDE)” output?
See the screenshot below to watch this comparison in action.
SCREENSHOT CHECKING FINGERPRINT (COMMANDS ABOVE):
IMPORTANT: I felt the need to explain 01:56 — do not accept the key (unless you previously recognize it). This key fingerprint acceptance is to demonstrate the plain ‘password: ‘ prompt itself (fingerprint acceptance required to show). Follow below for fingerprint checking instruction (or follow video after 3min).
TIP #1 FINGERPRINT CHECKING: Check the server’s fingerprint from a separate network (if working remotely from it), or if you have physical access + a monitor, even better. By using a separate network to check the fingerprint upon connection, you are compartmentalizing both client checks from one another, further verifying fingerprints match from multiple networks.
Running the fingerprint checking locally (serverside) is always the best method (when possible).
TIP #2 FINGERPRINT CHECKING:
write hosts/fingerprints down , post them on your wall/corkboard/office: no risk in having a written list of your machines hostname/ip + correct ssh fingerprints. This can save you from having to check.
Why? You may one day need to login from a new machine without physical access to the server. Having record can help you check without risking the login/accepting fingerprints remotely.
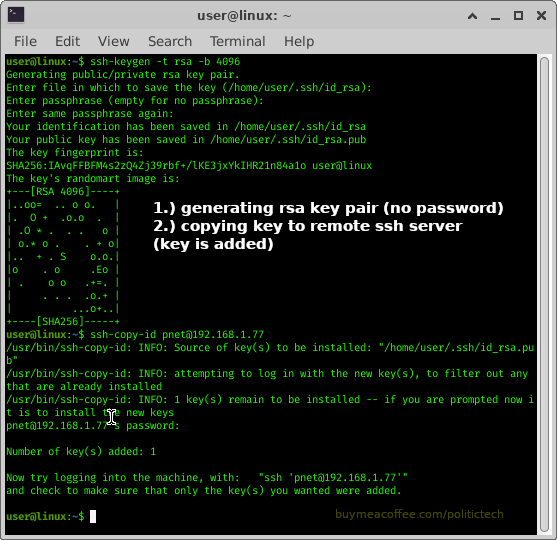
After working on fingerprint checks, we add the key to our server, allowing our client machine to automatically login upon connection.
GENERATE RSA KEY PAIR
ssh-keygen -t rsa -b 4096
PASSWORD-FREE KEY AUTH: MORE SECURE SSH ACCESS
COPY KEY TO SERVER:
ssh-copy-id username@host
SEE SCREENSHOT BELOW FOR ABOVE STEPS IN ACTION
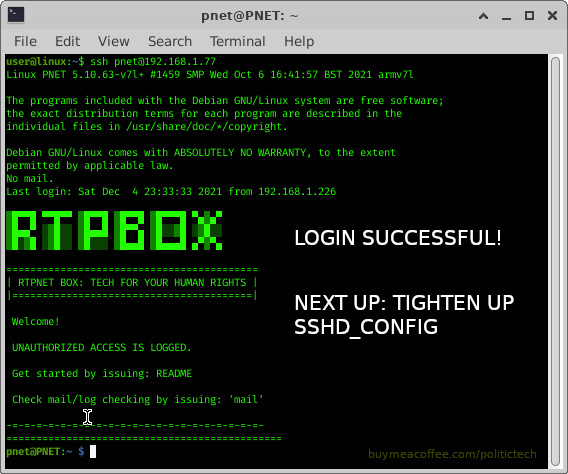
After successfully copying our key, we then connect by ssh to test it, if it lets us in without problem or password, we did it!
TESTING PASSWORD FREE KEY AUTHENTICATION
TIGHTEN UP SSHD_CONFIG (SERVERSIDE)
We add a few more lines to /etc/ssh/sshd_config, ensuring only our machine can login: (disabling password guessing by relying on our newly minted key alone)
/etc/ssh/sshd_config:
PasswordAuthentication no ChallengeResponseAuthentication no UsePAM no
Restarting SSH allows our configuration changes to take effect:
sudo systemctl restart ssh
[Timestamps are found inside the video description]
* BONUS: PART III: Tor SSH .Onion (Hidden Service):
This 3rd (optional) video shows how to setup SSH access as a Tor Hidden Service.
BENEFIT #1: By disabling ssh locally and allowing only the Tor ssh we prevent unknown machines from attempting brute force attacks (if we failed to follow previous videos). The only ssh attempts will be from those you give the onion address to.
BENEFIT #2: Additional layer of end to end encryption between the tor clients on ssh client and server side. Add to this the ssh encryption keys/fingerprints themselves on your client/software side, and you have a much more secure ssh setup.
Comments/Questions Welcome below:
Like content/videos like this? Share it with Linux users (Reddit, Telegram, Discord, IRC).
❤️ If you appreciate content like this and want to ☕ Buy Me a Coffee hit ‘support’ button on: Home Page
Thoughts, comments and any questions welcome below.
Share this post with everyone. Leave your thoughts below.
(Share to help this grow. ❤️ ———————————————————————- PUBLIC COMMUNITY SERVERS: 🧅🔐 ANONYMOUS GITEA (.onion):Books, Code/Scripts, Wiki, more (make a repository) 🧅🔐 PASTEBIN (.onion): anon pastebin pw protect, zk-256bit, “Burn After Reading” + more ———————————————————————- 💖 🤗 SUPPORT (If you like) 🎁 EXTRAS: something unique for your Support here ———————————————————————- FOLLOW: ✍🗒 MASTODON 🐦 TWITTER 📺 🎞 PEERTUBE 📺 🎞 BITCHUTE 📺 🎞 ODYSEE 📺 🎞 YOUTUBE ——————————————————————— ✉ CONTACT ————————————————————————